Getting Started with Rezon8AI
Welcome to Rezon8AI!
This platform is designed to help your business grow by building and protecting your online reputation—automatically.
Whether you're a solo operator, local team, or multi-location brand, Rezon8AI gives you the tools to:
-
✅ Ask for feedback or reviews from all your customers
-
⚠️ Intercept negative feedback before it goes public
-
💬 Automate responses using AI
-
📊 Track sentiment and insights
-
📥 Create action plans to fix issues fast
Let’s get started!
Set Up Your Organisation Profile
Before you do anything else, configure your Organisation Settings. This ensures Rezon8AI understands your business and can represent you properly.
👉 Go to Organisation Settings
Complete these steps:
-
Fill in your Organisation Details (name, website, address, owner)
-
Add your Business Description and upload your logo
-
Choose whether you offer products or services
-
Upload your support documents (FAQs, T&Cs, brochures, etc.)
🧠 Why this matters: Our AI uses your brand voice and uploaded materials to answer questions and handle feedback automatically.
Add Your Products or Services
Go to the Products & Services section to activate and configure what your business offers.
-
Click Activate a Product or Service at the top-left of the page
-
Fill in the product/service name, type, price, and description
-
Upload any product-specific documents (manuals, scripts, FAQs)
-
Set up Authorised Actions for the AI to take, like refunds, rebooks, or discount codes
💡 Tip: The more details you give, the smarter and more relevant your AI replies will be.
Add Your Customers
Go to the Customers section to add or import the people you serve.
You can either:
-
Click Add Customer and enter details manually
-
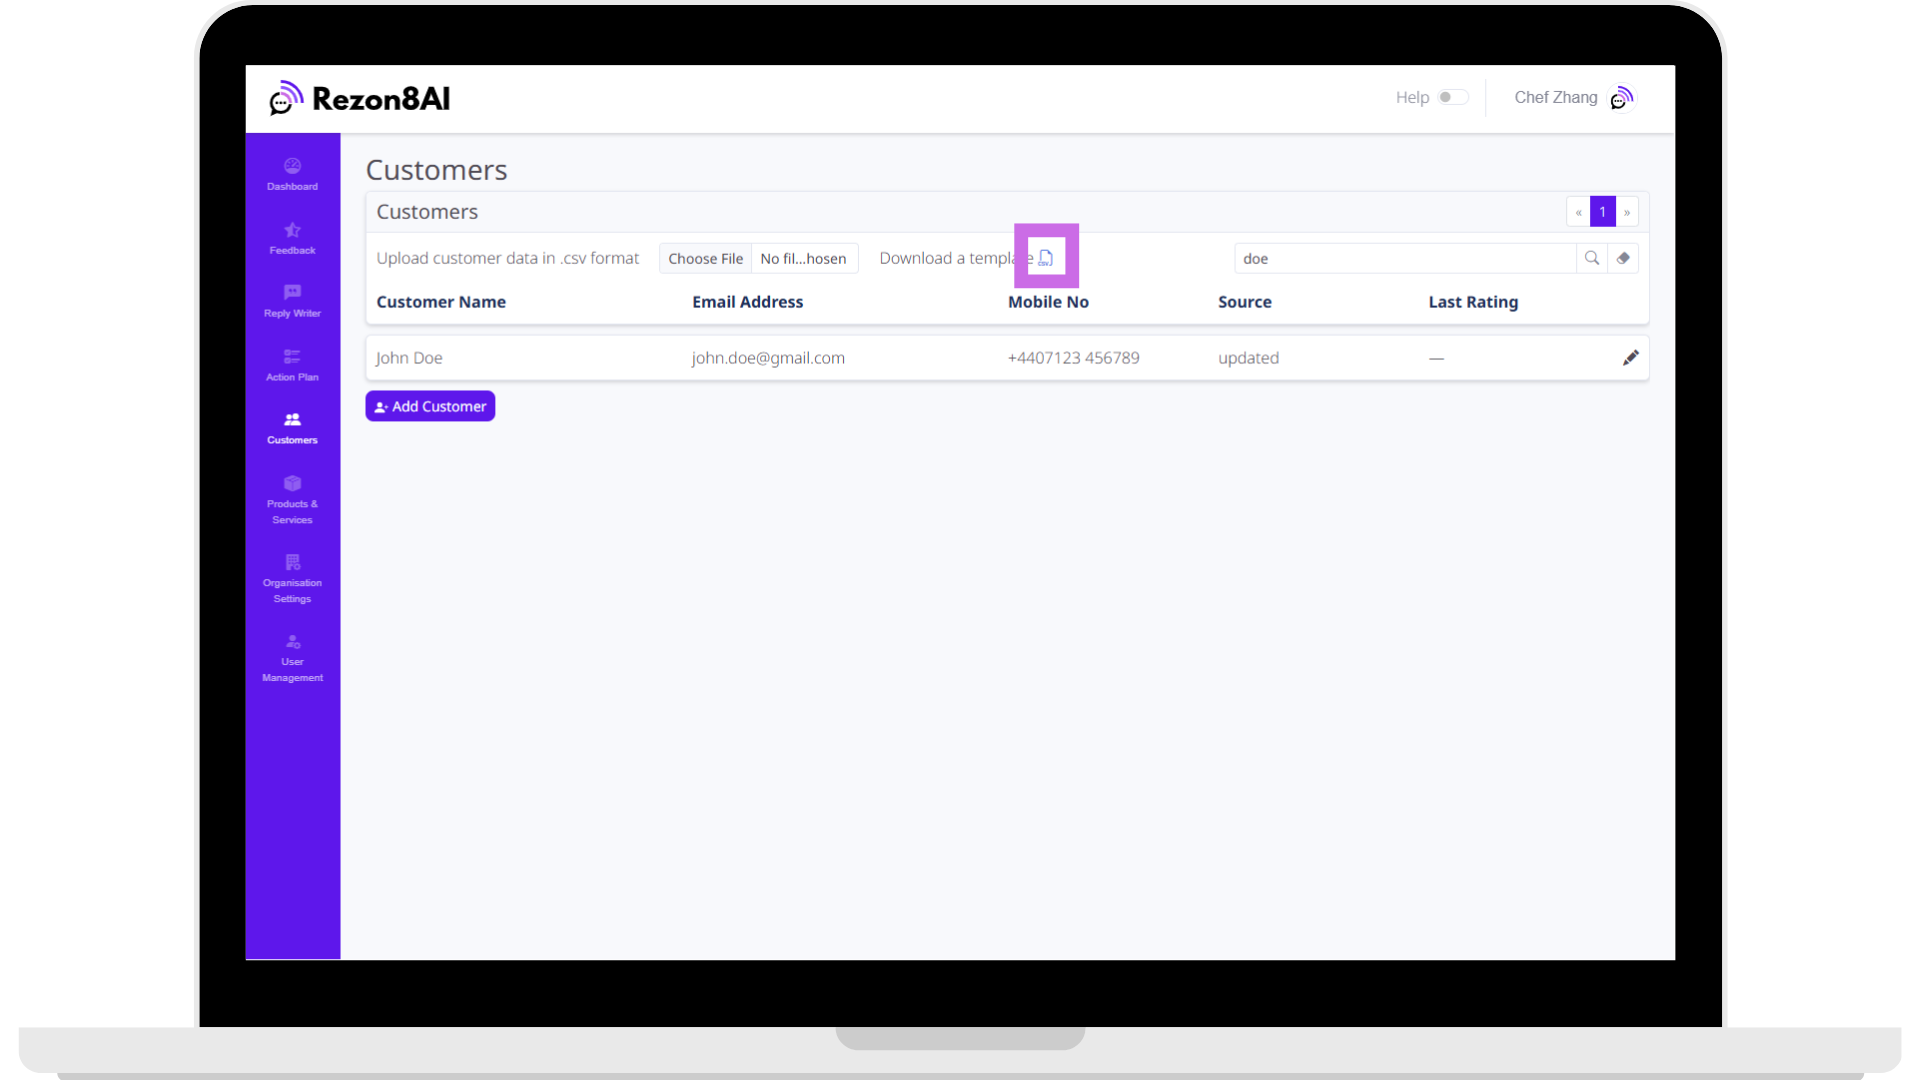
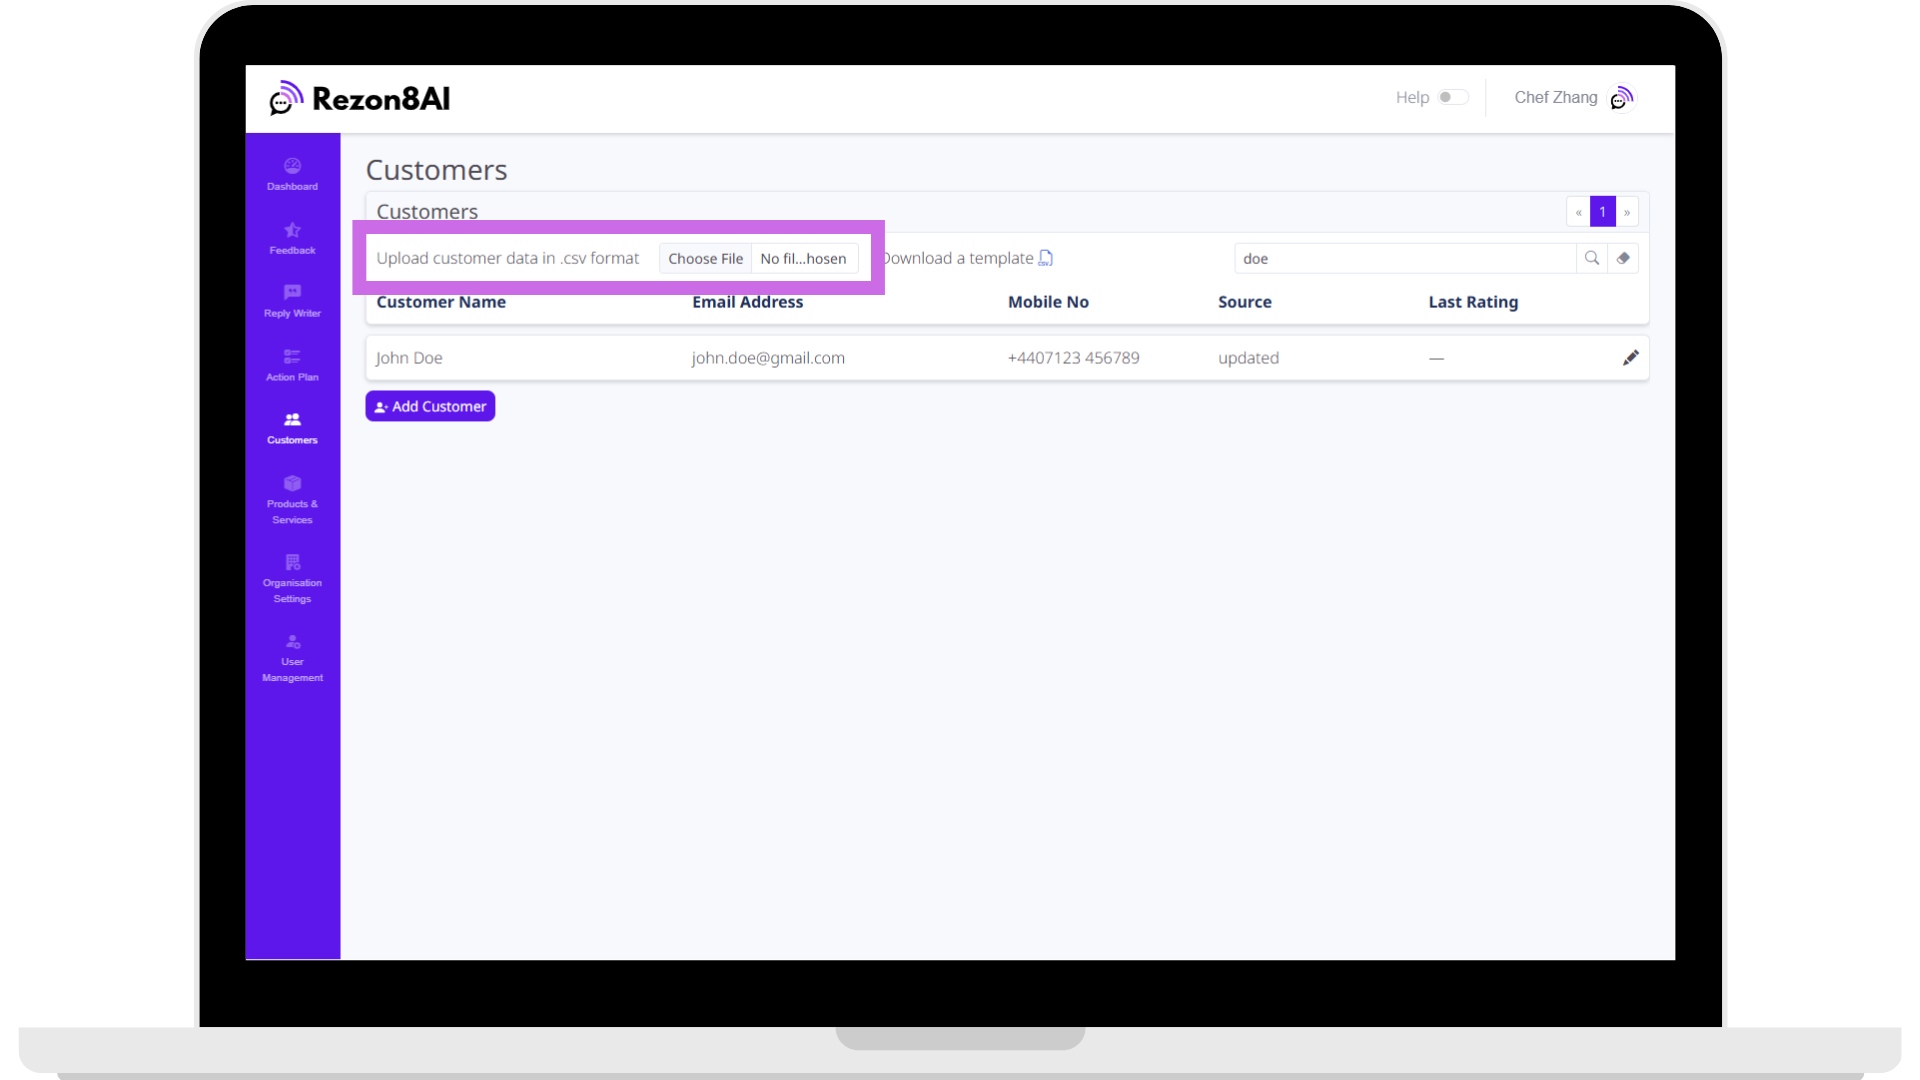
Or click Choose File to import a list of customers using the provided template (you can download the template by clicking the icon)
-
You can always add new customers from the main app or from the mobile web app
Another route for customers is when they scan a QR code, if the AI is able to obtain a name and contact details it will check the customers database and add them if they're not already there. If they are there then it will attribute the conversation to them.
Once customers are in the system, you can send review requests in seconds.
Start Requesting Reviews
Head to the Feedback section and use the Request Feedback panel to reach out to customers.
Choose:
-
The customer (type their name)
-
The product/service they used
-
Their preferred contact method (email, SMS, or both)
-
The date of sale
Then click Request

You can also generate and download QR codes for collecting feedback in person.
Watch Feedback Roll In
(and Take Action)
When a customer responds:
-
Reviews and ratings appear in the Feedback section
-
Negative reviews trigger AI conversations
-
If issues are found, they’re automatically turned into tasks on your Action Plan kanban board
You’ll see what went wrong, how serious it is, and what to do next.
Reply to Reviews with AI
(Optional)
Use the Reply Writer tool to generate professional responses in multiple languages.
👉 Just paste in the review, select a language, and click Generate
Quick Tips for Success
-
Keep your organisation knowledge up to date—this powers your AI.
-
Regularly check the Action Plan to stay on top of issues.
-
Use the Dashboard to see what’s working and where to improve.
-
Upgrade plans anytime if you hit usage limits.
You're now ready to take full control of your reputation.
If you need help with anything specific, check out the full support guides or contact our team.
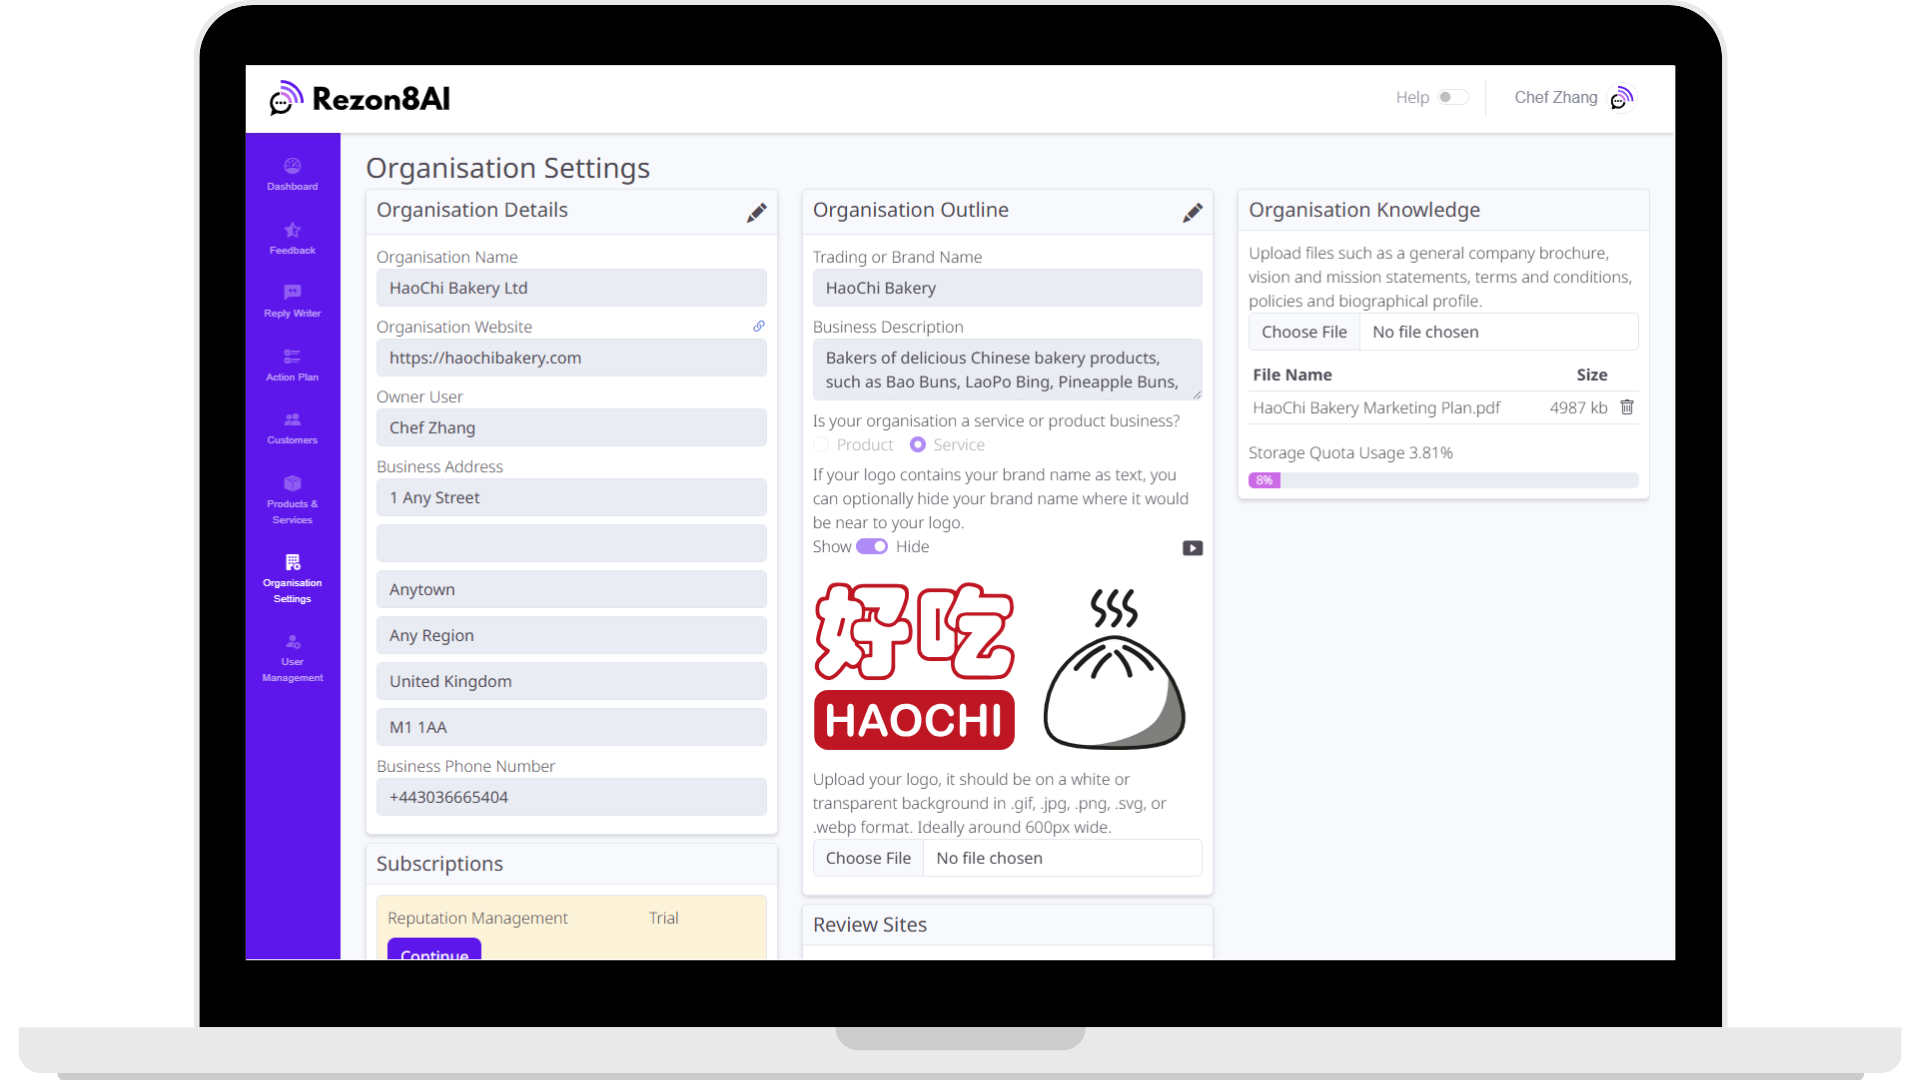
What Are Organisation Settings?
The Organisation Settings area is your central hub for configuring how Rezon8AI understands and represents your business. It includes:
-
Organisation Details Official name, address, website, phone etc.
-
Organisation Outline Brand name, business description, business type and logo
-
Organisation Knowledge Detailed knowledge about your business including terms and conditions, returns policies, service expectations, brochures etc.
-
Review Sites - The sites where you want to direct customers if they rate you highly
-
Subscription Management Where you see what subscriptions you have, upgrade them or downgrade them.
🧠 Why it matters: Rezon8AI uses this information to personalise review collection, customer engagement, sentiment analysis, and automated AI interactions. If this is not set up, the system cannot operate properly.
Organisation Details
Located on the left side of the screen, this panel contains core business information such as:
-
Organisation Name This is your legal entity name (could be a limited company, or your personal full name if you're a sole trader)
-
Website The full url of your website (eg https://rezon8ai.com)
-
Owner User (can be reassigned)
-
Business Address Registered business address
-
Phone Number The main phone number your customers should call
To Edit Your Organisation Details:
-
Click the pencil icon in the top right corner of the panel.
-
Update the fields as needed.
-
Use the drop-down to change the Owner User if necessary (this user manages subscription and account settings).
-
Click the Update button to save changes.
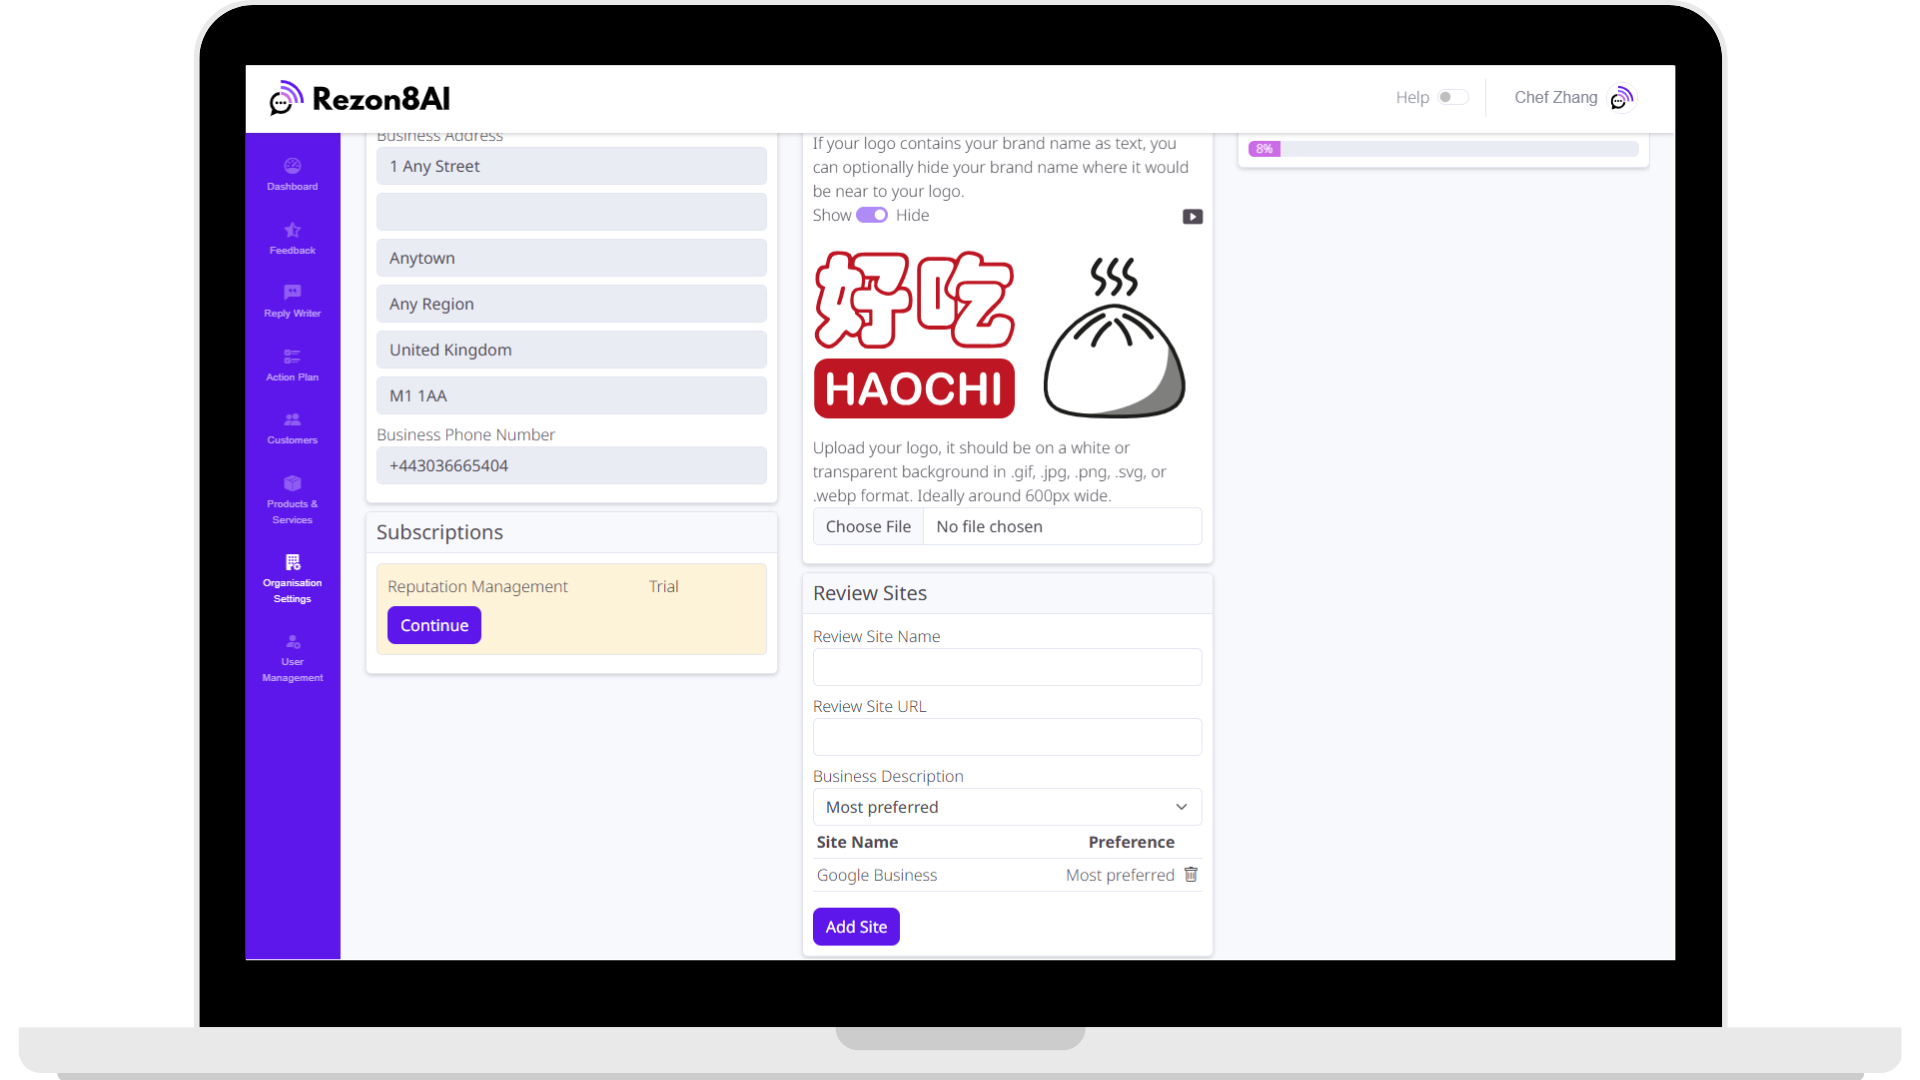
Organisation Outline
Located in the middle column, this section captures your brand personality and how the AI represents your business.
-
Trading or Brand Name the name your customers know you as
-
Business Description a detailed description of what your business does and what your values are
-
Service or Product selector specify whether you consider your business to be primarily a service provider or a product based business
-
Logo Upload where you upload your logo
-
Brand name visibility toggle if your brand logo contains your brand name you may not want to repeat the name where it appears nearby a logo. Click the video play icon in the app for an example
To Complete:
-
Click the pencil icon at the top right of the Organisation Outline panel.
-
Enter your Brand/Trading name. That's the name your customers will recognise your business as. It doesn't need to be the same as your company name.
-
Provide a detailed Business Description – the AI uses this for customer interactions.
-
Choose whether your organisation is a Service or Product business.
-
Upload a Logo:
-
Format:
.gif,.jpg,.png,.svg,.webp -
Recommended: a white/transparent background, ~600px wide
-
-
Toggle the Show/Hide switch if your logo already contains your brand name.
-
Click the Update button.
Organisation Knowledge
Located on the right side, this is where you upload reference materials that the AI uses to respond to customers intelligently.
- Examples: Terms & Conditions, FAQs, Brochures, Policies, Mission/Vision statements.
Supported File Types
-
Documents:
.docx,.doc,.pdf,.txt,.tex -
Presentations:
.ppt,.pptx -
Web exports:
.html,.htm -
Markdown:
.md -
JSON Data:
.json
To Upload:
-
Click Choose File.
-
Select your document.
-
It will appear in the list below with storage usage.
💡 Why this is critical: The AI cannot answer complex customer queries accurately unless these documents are provided.
Review Sites
The Review Sites section ensures customers are routed to the correct platform (Google, Facebook, Trustpilot, etc.) after a positive experience.
-
You must add at least one.
-
Options for preference allow Rezon8AI to prioritise review sites enabling you to create a balanced review profile across the sites that are important to your business.
To Add:
-
Enter:
-
Review Site Name (e.g., “Google Business”)
-
Review Site URL That's the URL the review site gives you to send people to so they can leave a review for your organisation.
-
Preference from dropdown:
-
Most preferred This is the review site you want to send most of your high-rating customers
-
Less preferred Randomly these will be interspersed into your redirects, so you can balance out your review profiles
-
Least preferred Less randomly these will be interspersed into your redirects
-
Display all Multiple review sites will be shown to your customer, to allow them to choose
-
Don't use this site Allows you to turn off a review site for a period of time
-
-
-
Click Add Site.
The site will appear in a table below with a trash icon to delete.
💡 This tells Rezon8AI where to send customers based on how happy they are.
Subscription Management
-
Found at the bottom-left of Organisation Settings.
-
Shows the current plan and trial status.
-
Only visible/editable by the Owner.
If you are in a trial there will be a Continue button. To continue your trial you will need to click this and provide payment details.
If you have an active subscription you will see a Manage button, you can click it to manage your subscription, upgrade or downgrade tier or purchase add-on packs.
If you have an expired or suspended subscription all other sections of the system will be disabled, but you can use the Re-start button to update payment details and resume your subscription.
📌 Tip: Trial accounts still have limits. Set up your organisation fully so you can maximise usage before it ends.
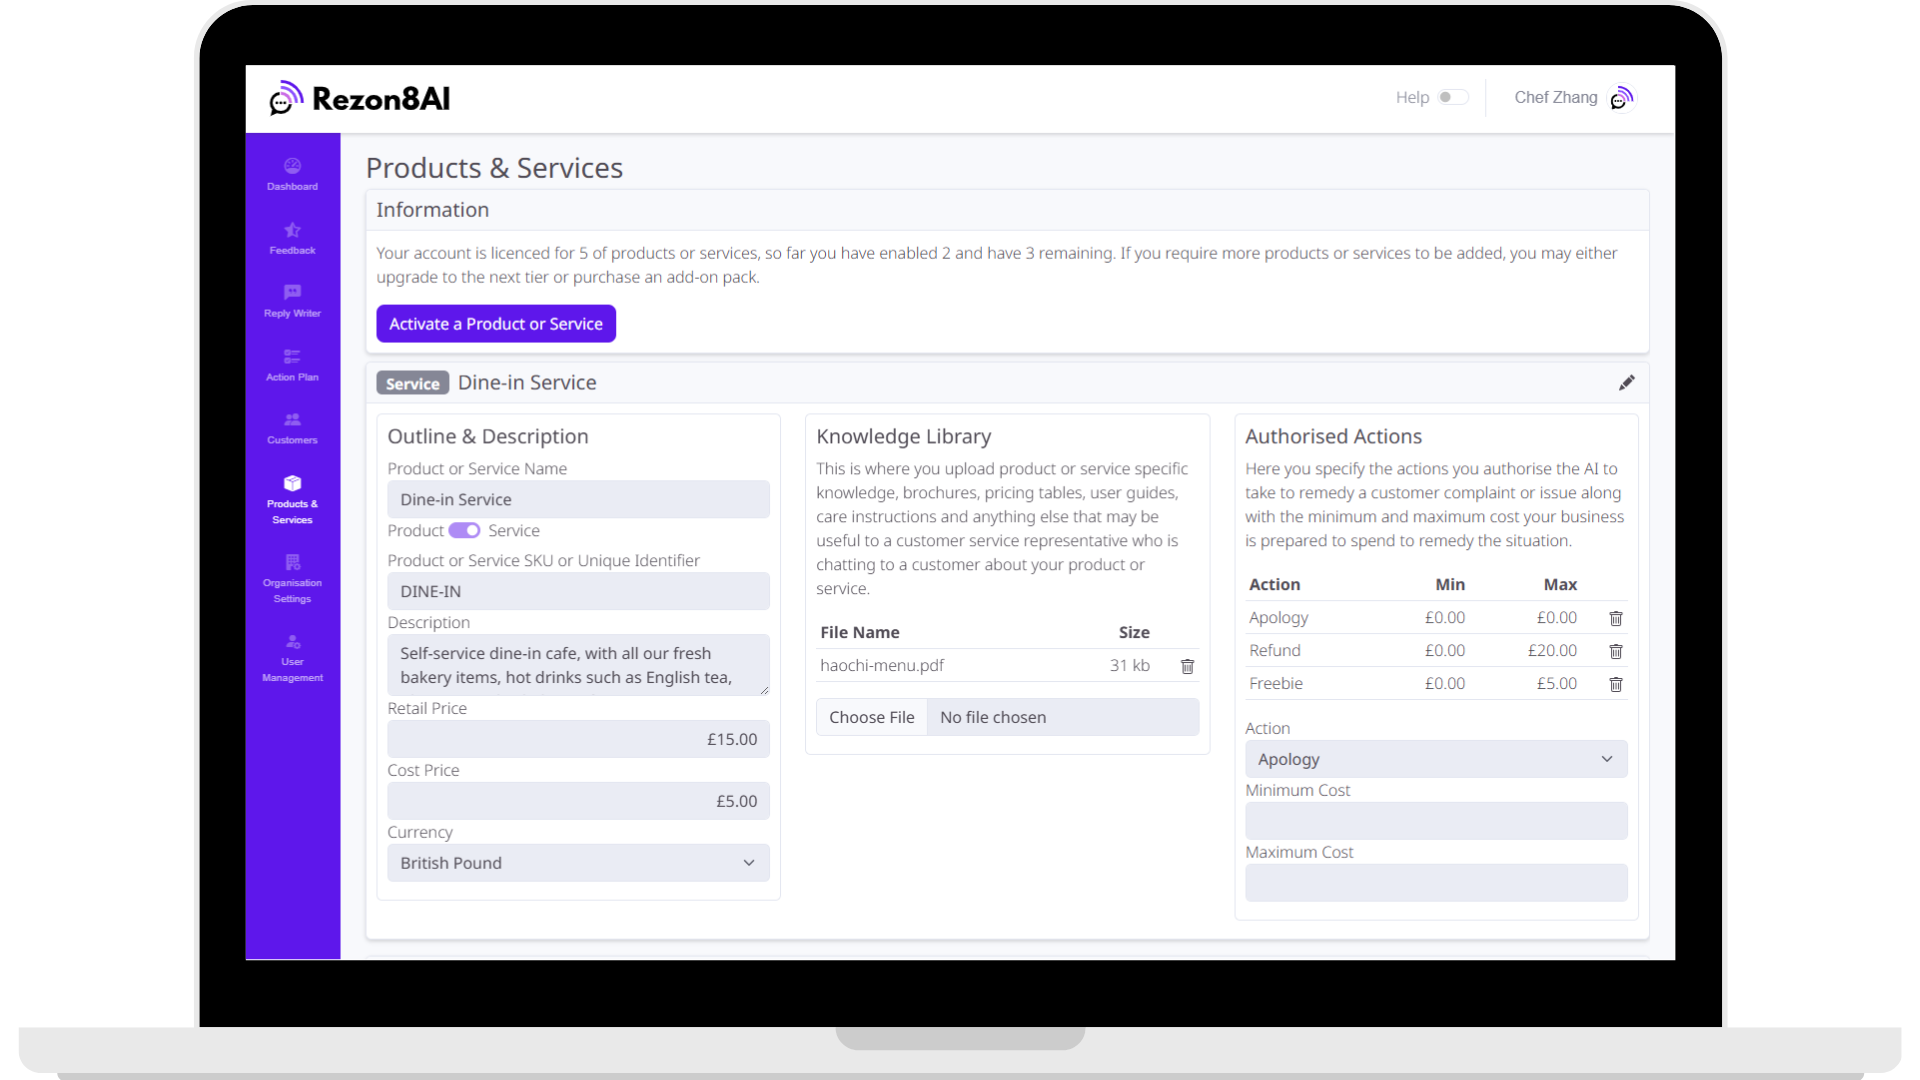
Products & Services Overview
This section allows you to add, manage, and configure your organisation’s products and services. These are the items that customers will give feedback on when review requests are sent.
When you first go to this section there will be no products. To activate a product click the Activate a Product or Service button.
Each product or service is shown as a panel once activated, you can configure it via the following three sections:
-
Outline & Description (left section)
-
Knowledge Library (centre section)
-
Authorised Actions (right section)
How to Use Products & Services
This guide walks you step-by-step through activating, configuring, and managing your products and services in Rezon8AI. These items are essential for capturing customer feedback and enabling AI-powered responses and actions.
Check Your Product/Service Limit
Step 1:
At the top of the page, under “Information”, you’ll see a note showing how many products or services your plan allows—and how many you've already activated.
💡 Why this matters: Each product or service uses one slot. If you're out of slots, you’ll need to upgrade or purchase an add-on to activate more.
Activate a Product or Service
Step 2:
Click the purple “Activate a Product or Service” button at the top of the page.
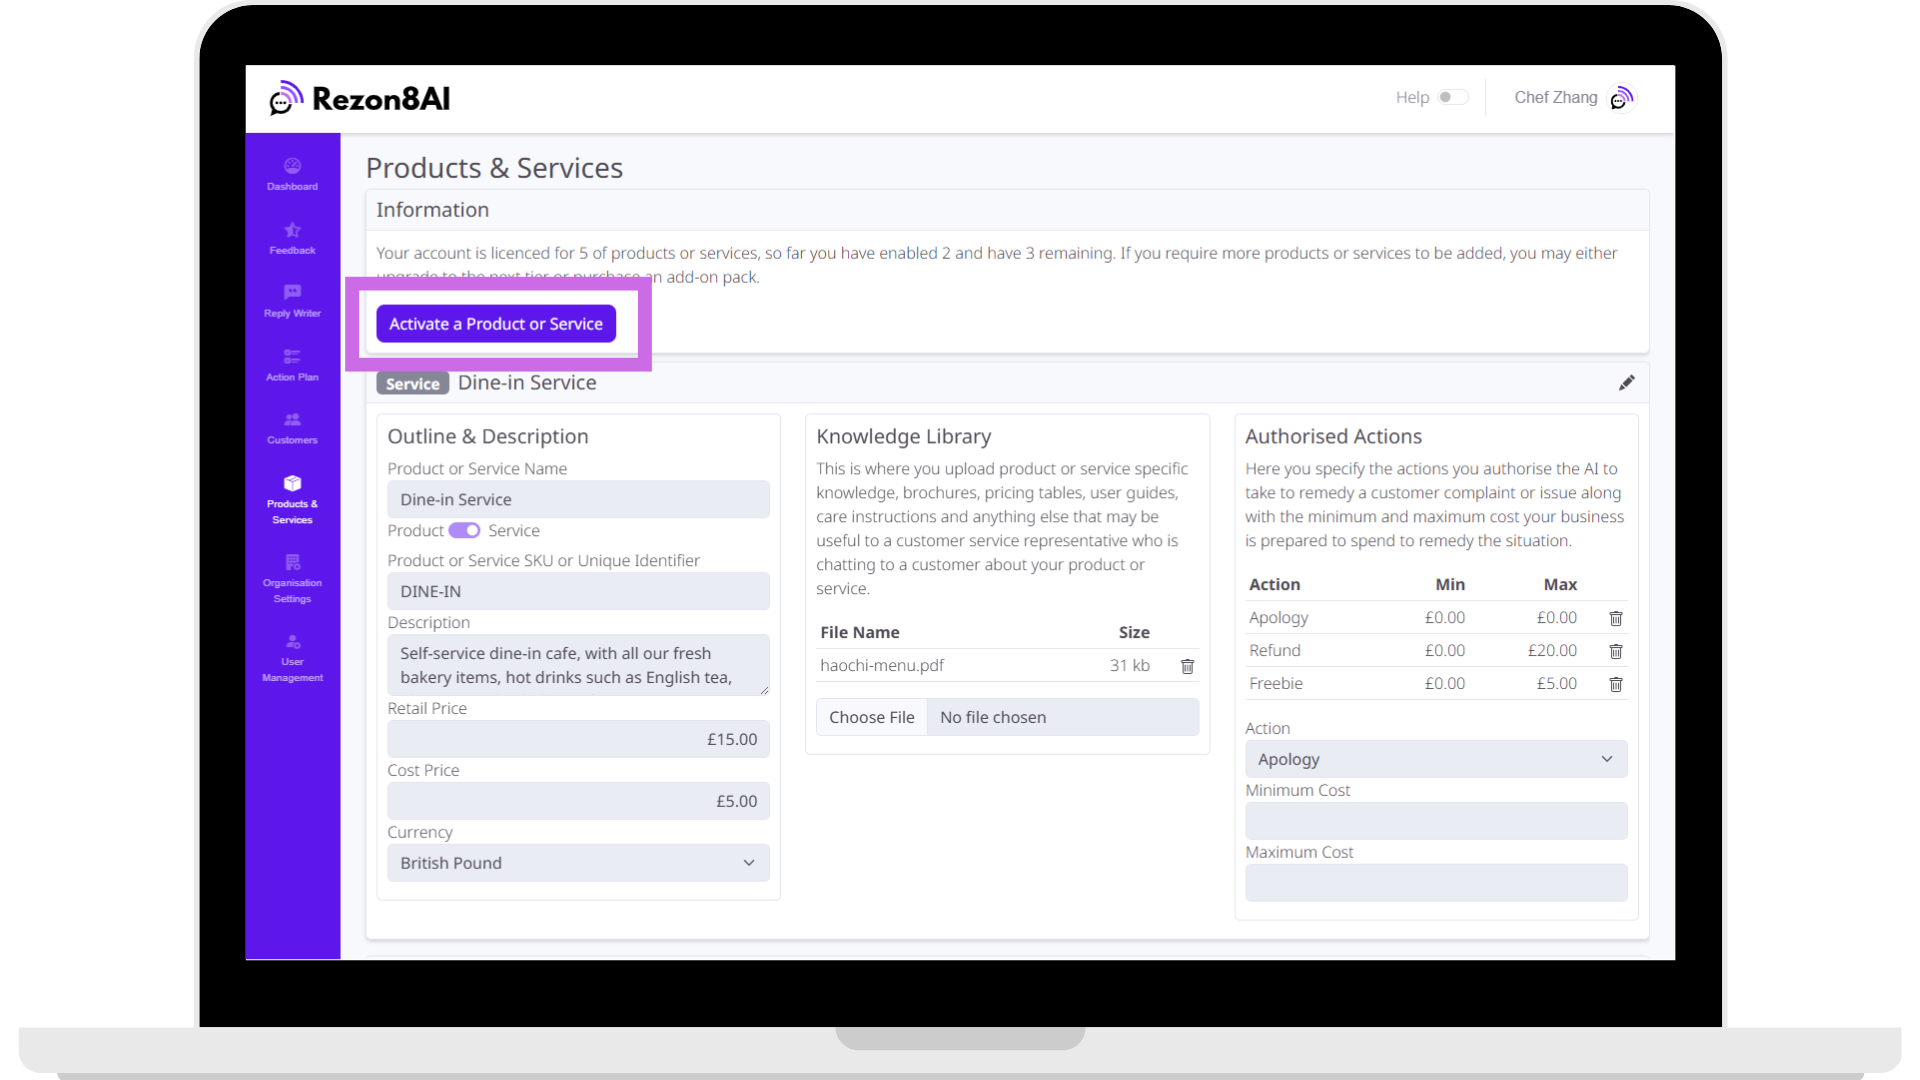
🪄 What happens: A new blank product/service panel appears below, ready for setup.
Enter Basic Product or Service Details
Step 3:
Click the pencil icon in the top-right corner of the new panel to enter edit mode.
Fill out the fields on the left under “Outline & Description”:
-
Product or Service Name – Enter a clear, recognisable name your team will understand.
-
Product / Service Toggle – Switch to either Product or Service depending on what you're adding.
-
Location / Site - Choose the location or site (Note: only available in Growth and Accelerate plans)
-
SKU or Unique Identifier – Use a code or label you use internally to track this item (e.g. “RMS-STD”).
-
Description – Write a short description of what this is and what it does.
-
Retail Price – How much customers pay for it.
-
Cost Price – Your internal cost to provide it.
-
Currency – Choose from GBP, USD, EUR, AUD, NZD, or CAD.
Click the Update button when done.
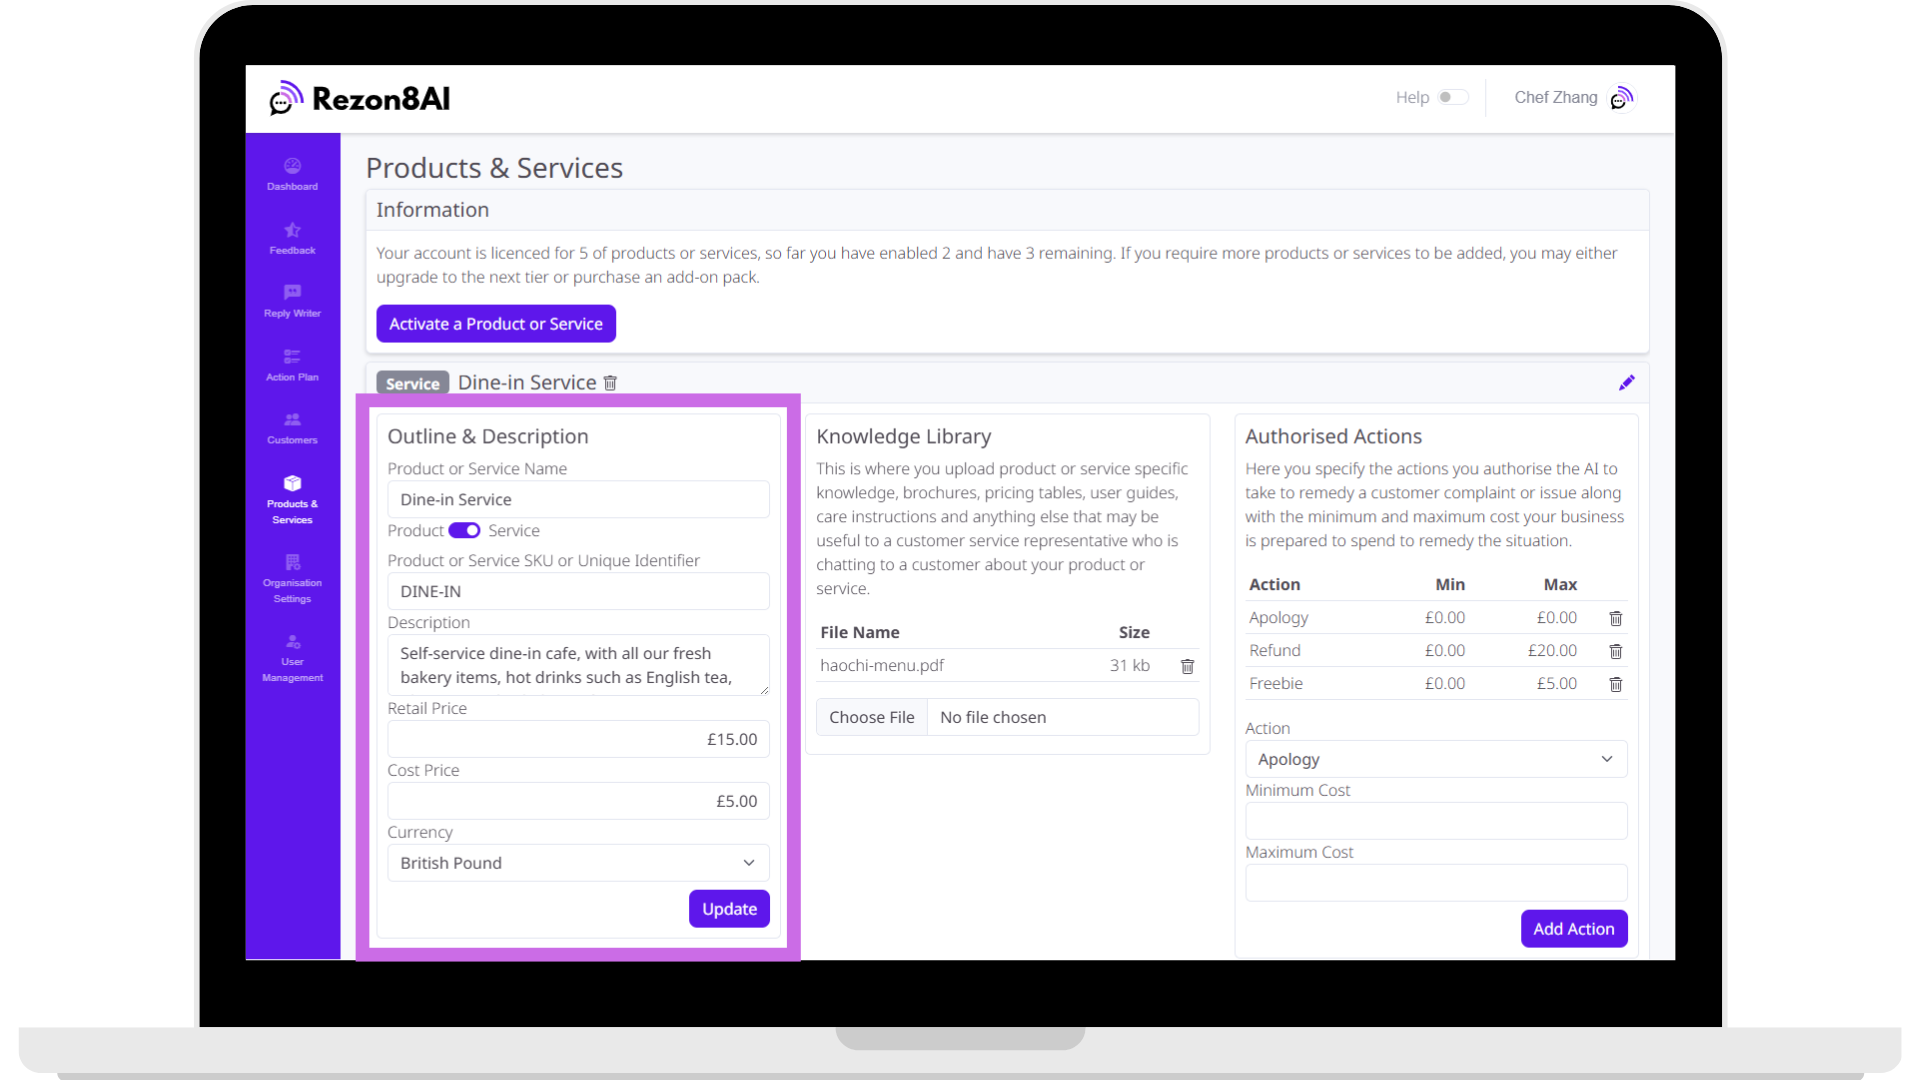
💡 Why this matters: These details help the AI understand your offerings, and price-based actions (like refunds) rely on this info being accurate.
Upload Helpful Knowledge
Step 4:
(Optional, But Powerful)
In the middle Knowledge Library section, upload any files that can help the AI chat system answer customer questions.
Click Choose file and select a file from your computer. Allowed file types include:
-
Documents:
.docx,.pdf,.txt,.tex -
Presentations:
.pptx -
Web exports:
.html,.htm -
Markdown:
.md -
JSON Data:
.json
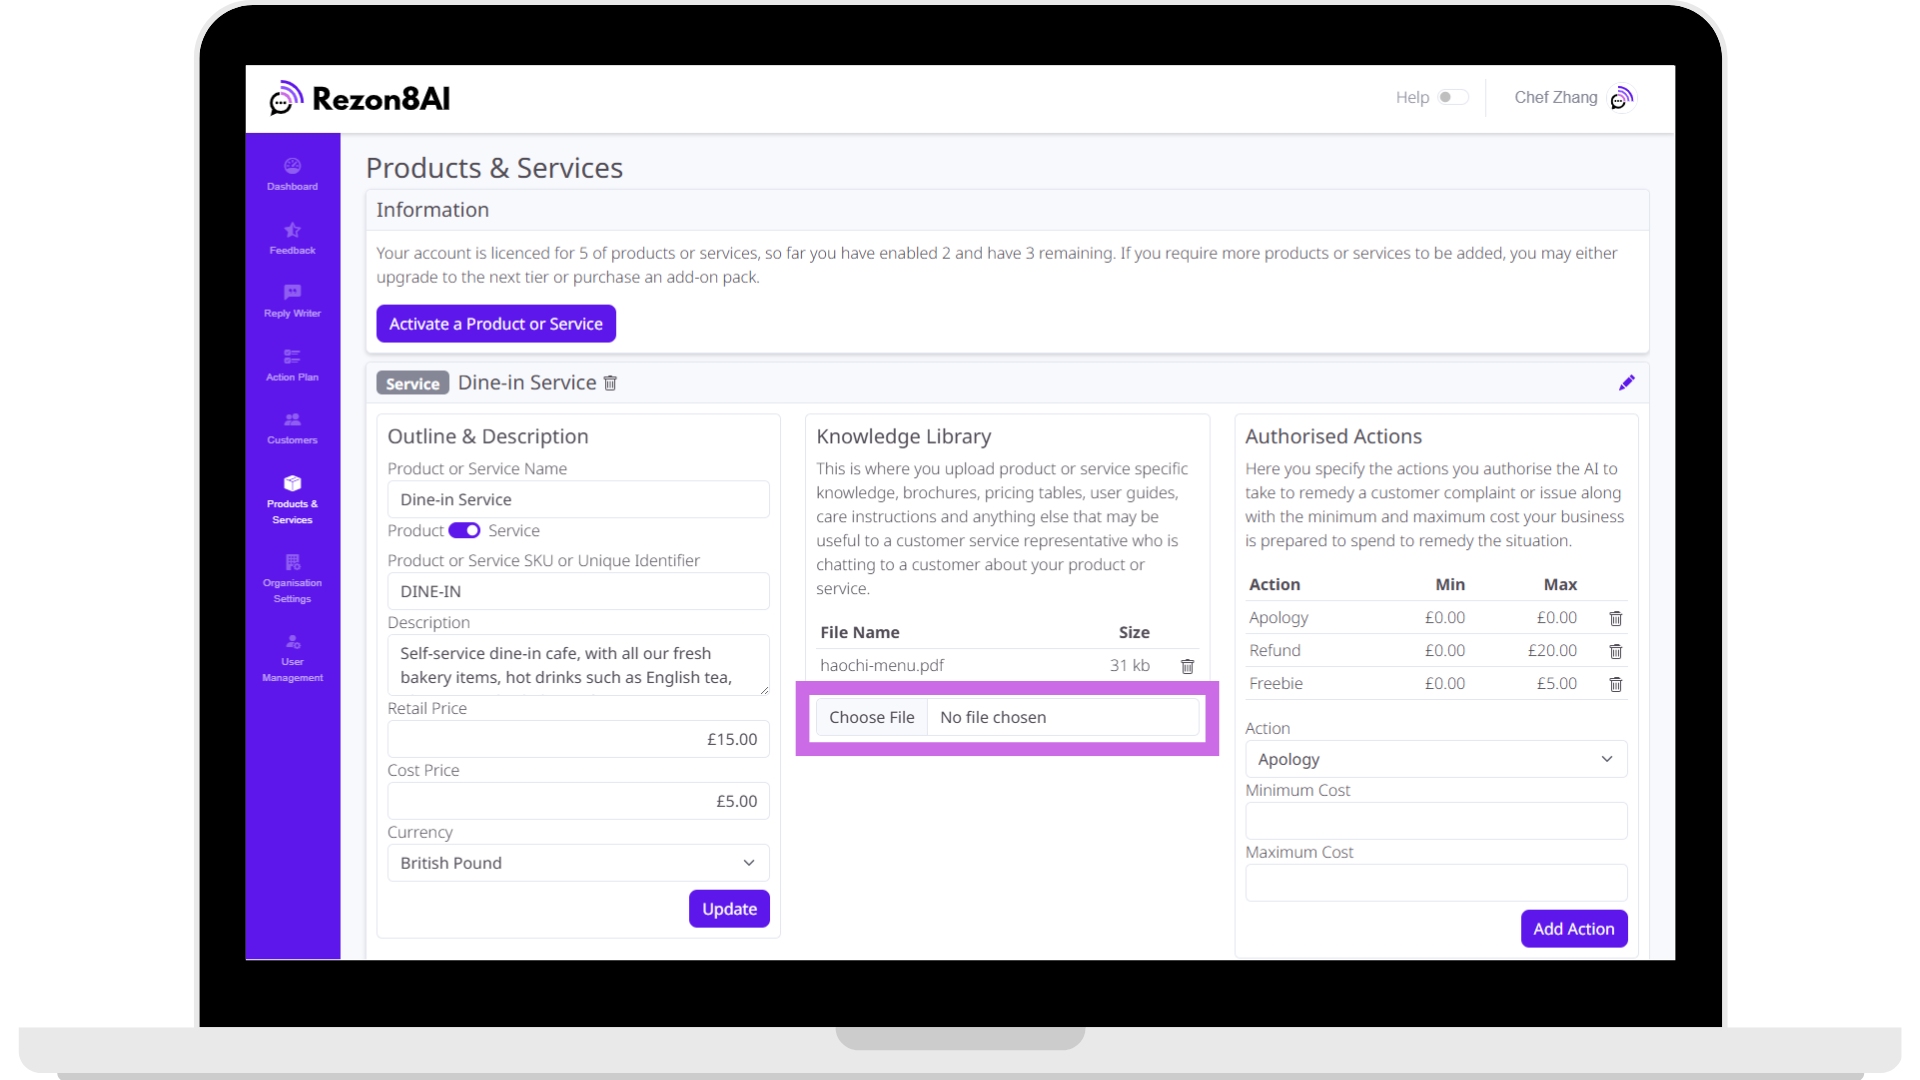
💡 Why this matters: Uploading product-specific documents enables the AI to provide accurate answers when customers ask questions via chat or during feedback resolution.
Set Up AI Authorised Actions
Step 5
On the right-hand side of each product/service panel, you can allow the AI to take specific pre-approved actions to resolve issues, like:
-
Apologise
-
Offer a refund
-
Rebook a service
-
Send a voucher
-
Provide compensation
To add an action:
-
Choose an action from the dropdown.
-
Enter the minimum and maximum cost limits (e.g. £0.00 to £10.00).
-
Click Add Action.
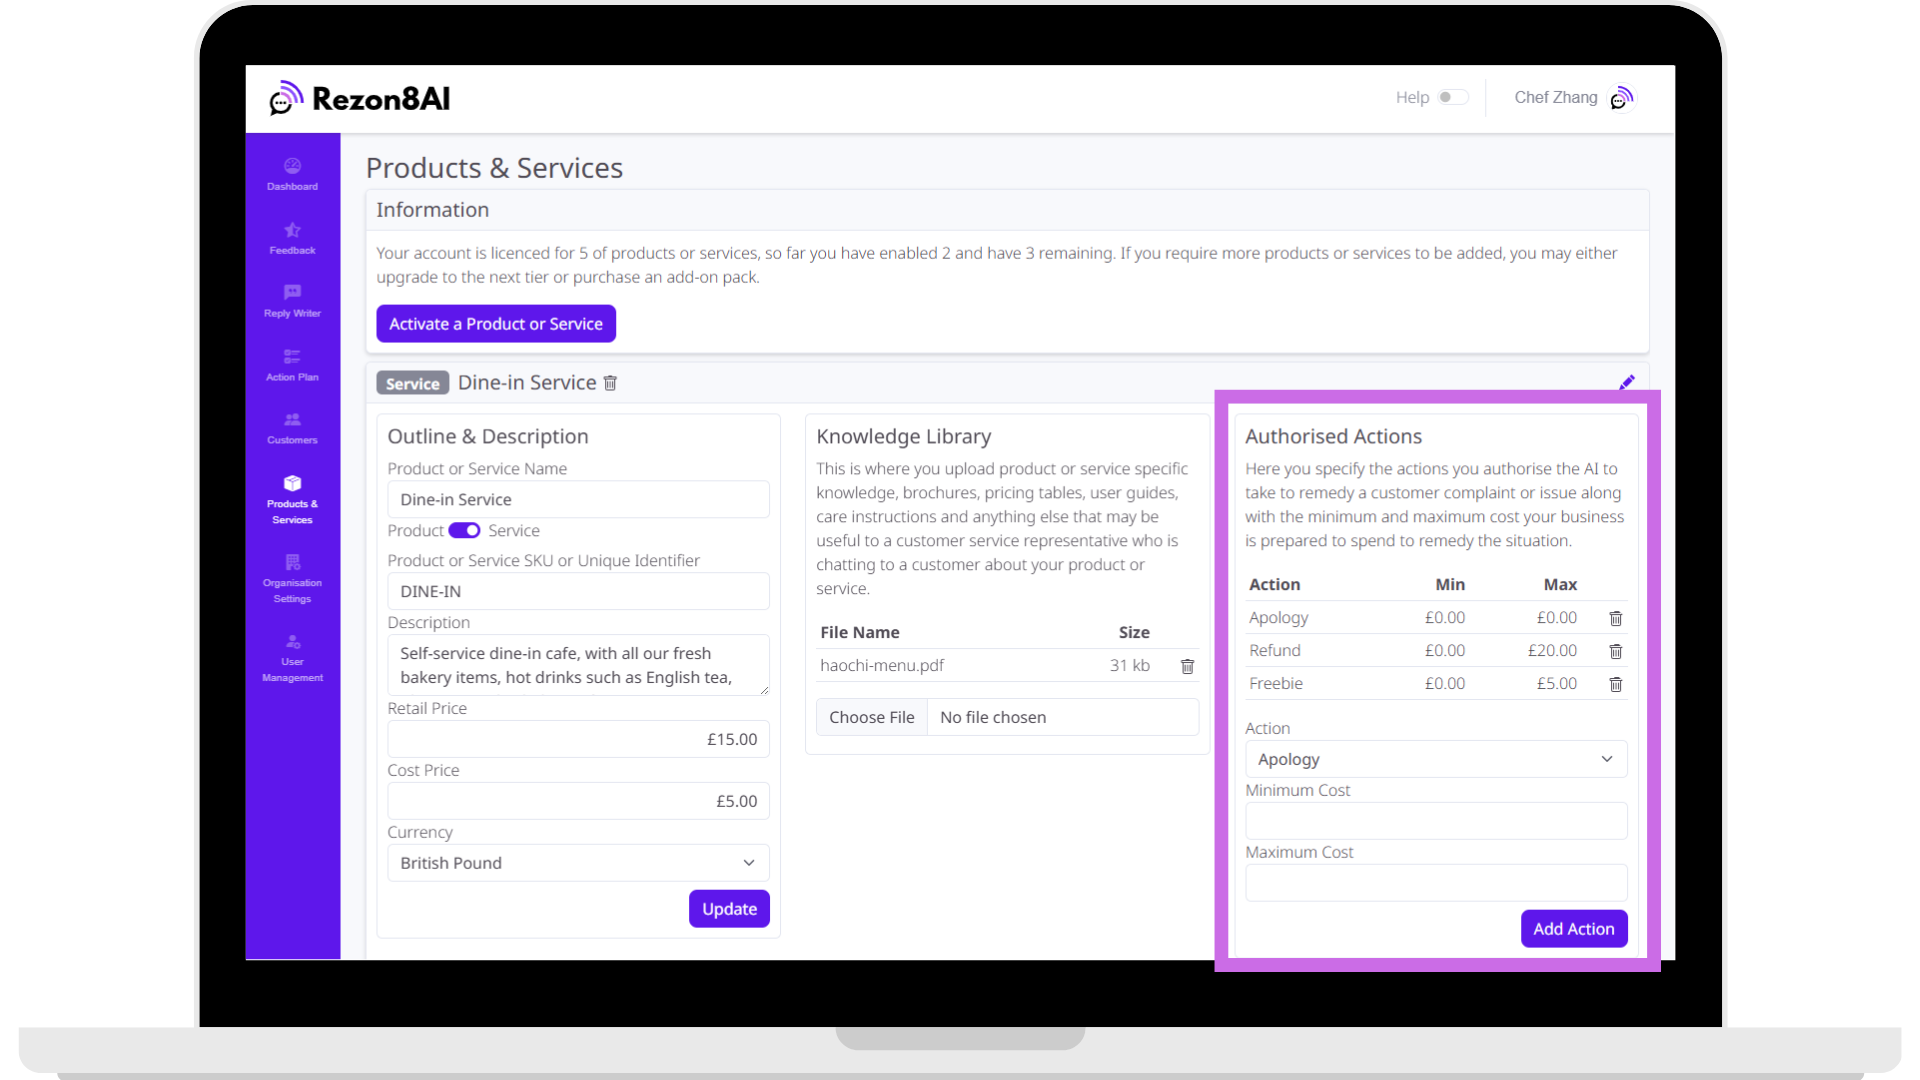
💡 Why this matters: These actions let the AI respond instantly and smartly to negative feedback—within the boundaries you set.
Remove a Product or Service
Step 6:
(Optional)
If you no longer need a product or service, click the trash can icon next to its name to delete it.
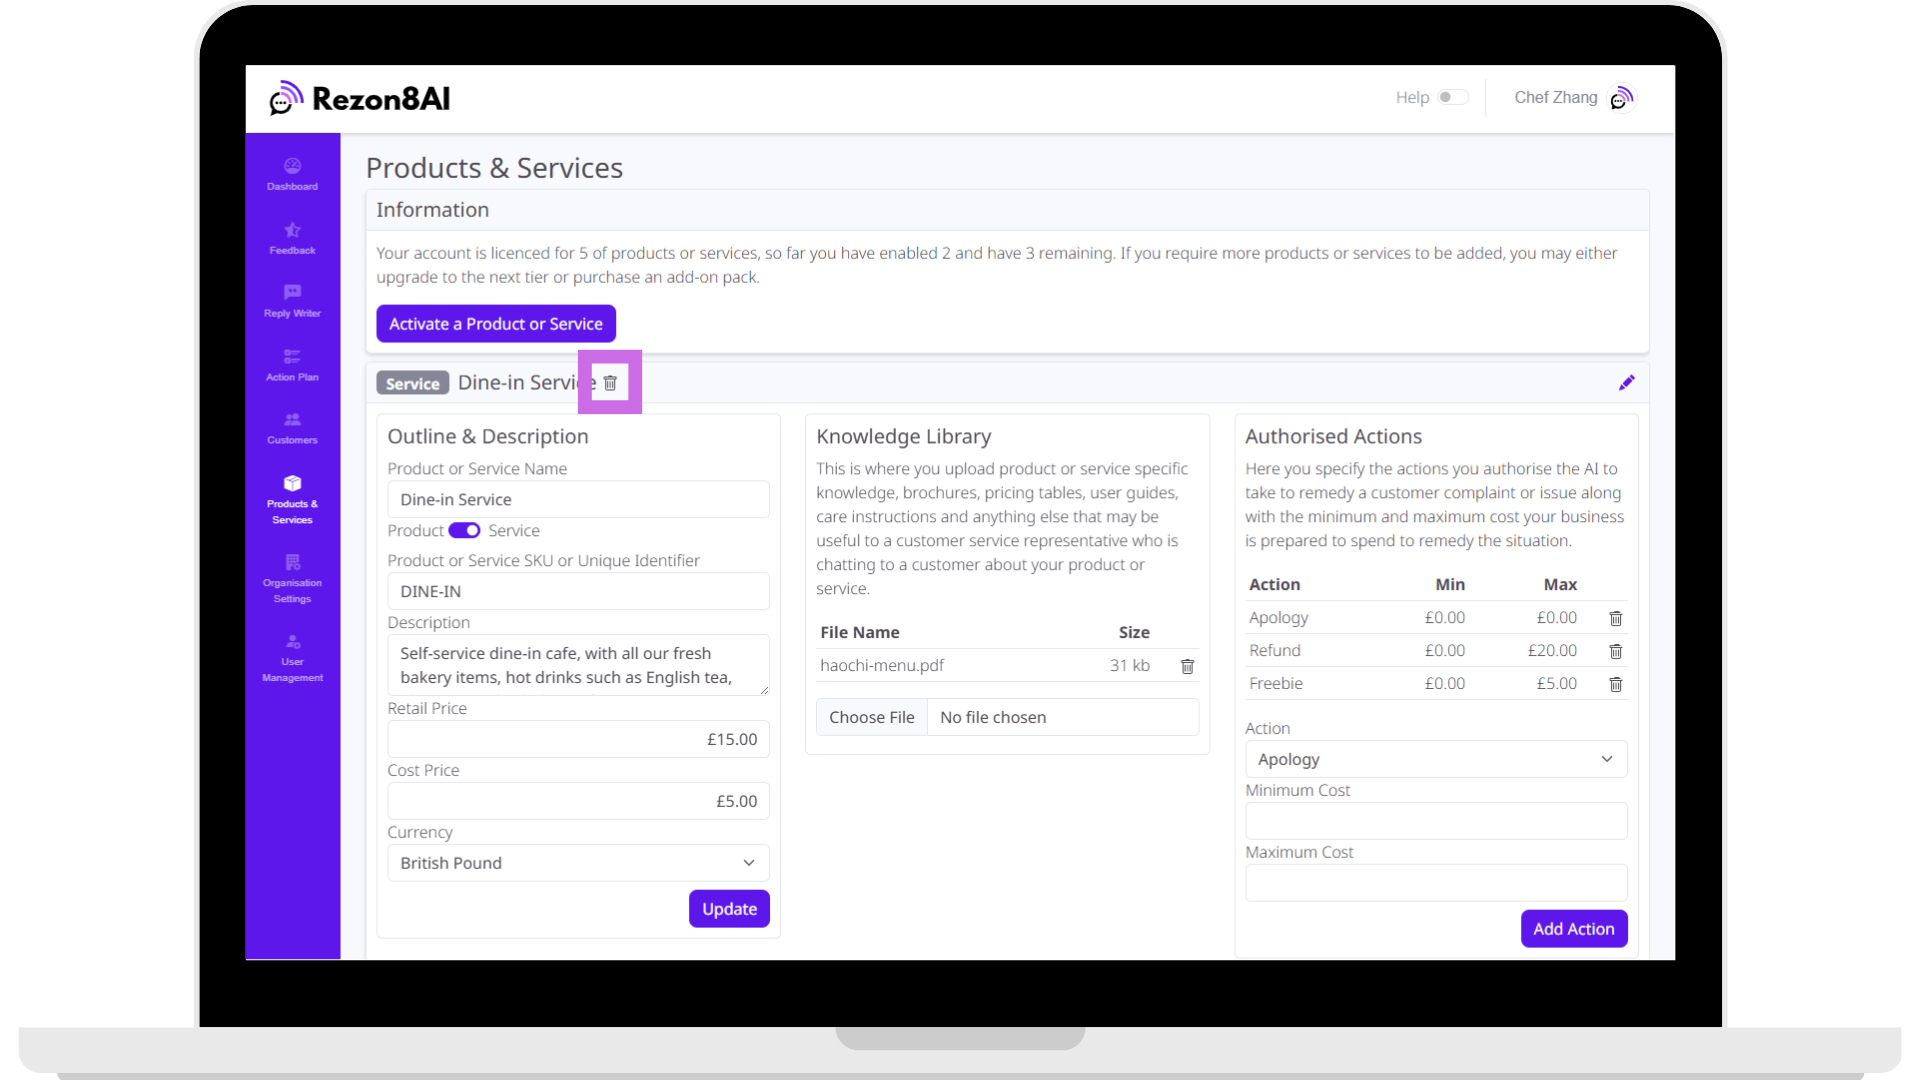
💡 Why this matters: This frees up space in your plan to activate something else.
Final Notes
-
Rezon8AI uses your products/services to customise review requests and feedback analysis.
-
Keep your details and documents up to date for better AI support and accurate business insights.
-
You can revisit this page at any time to update, add, or remove items.
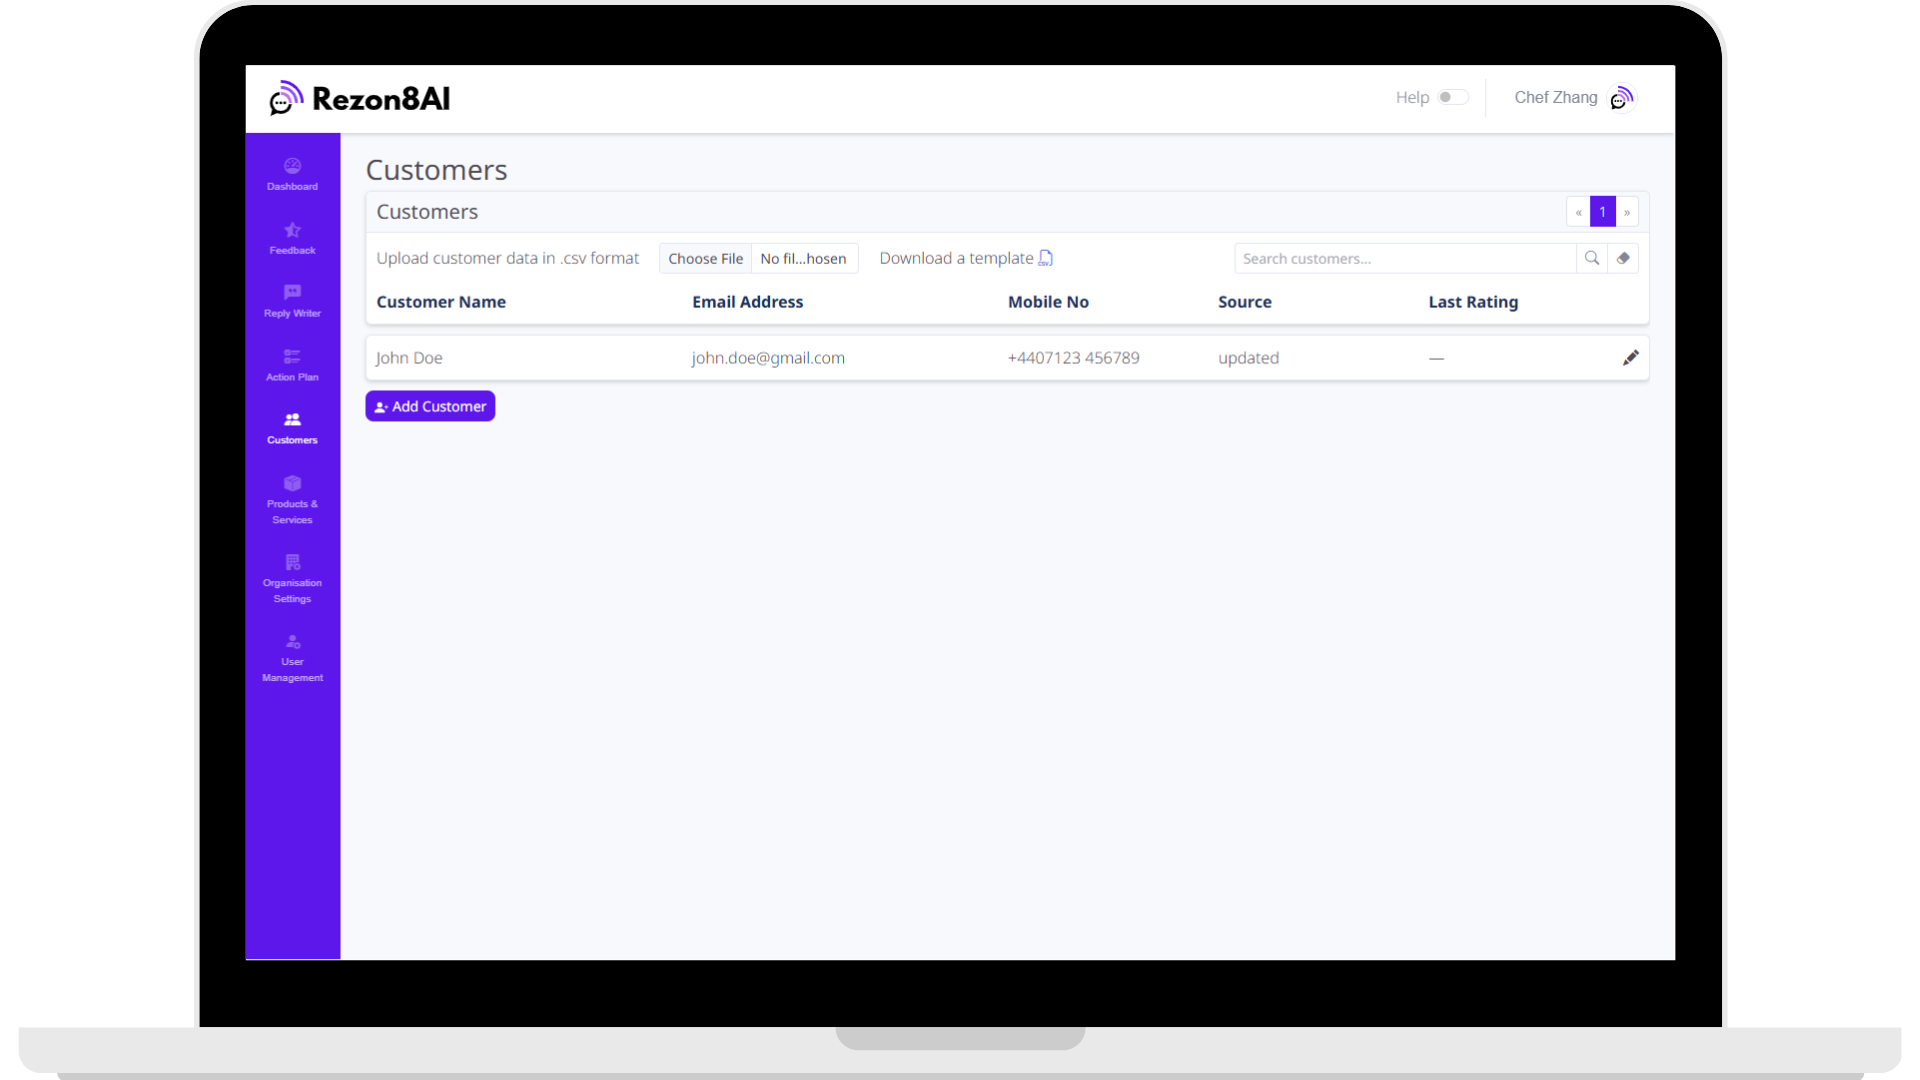
Working with Customers
The Customers page is where you store, search, and manage the people and businesses you serve. This is essential for sending review requests, tracking feedback, and maintaining great relationships.
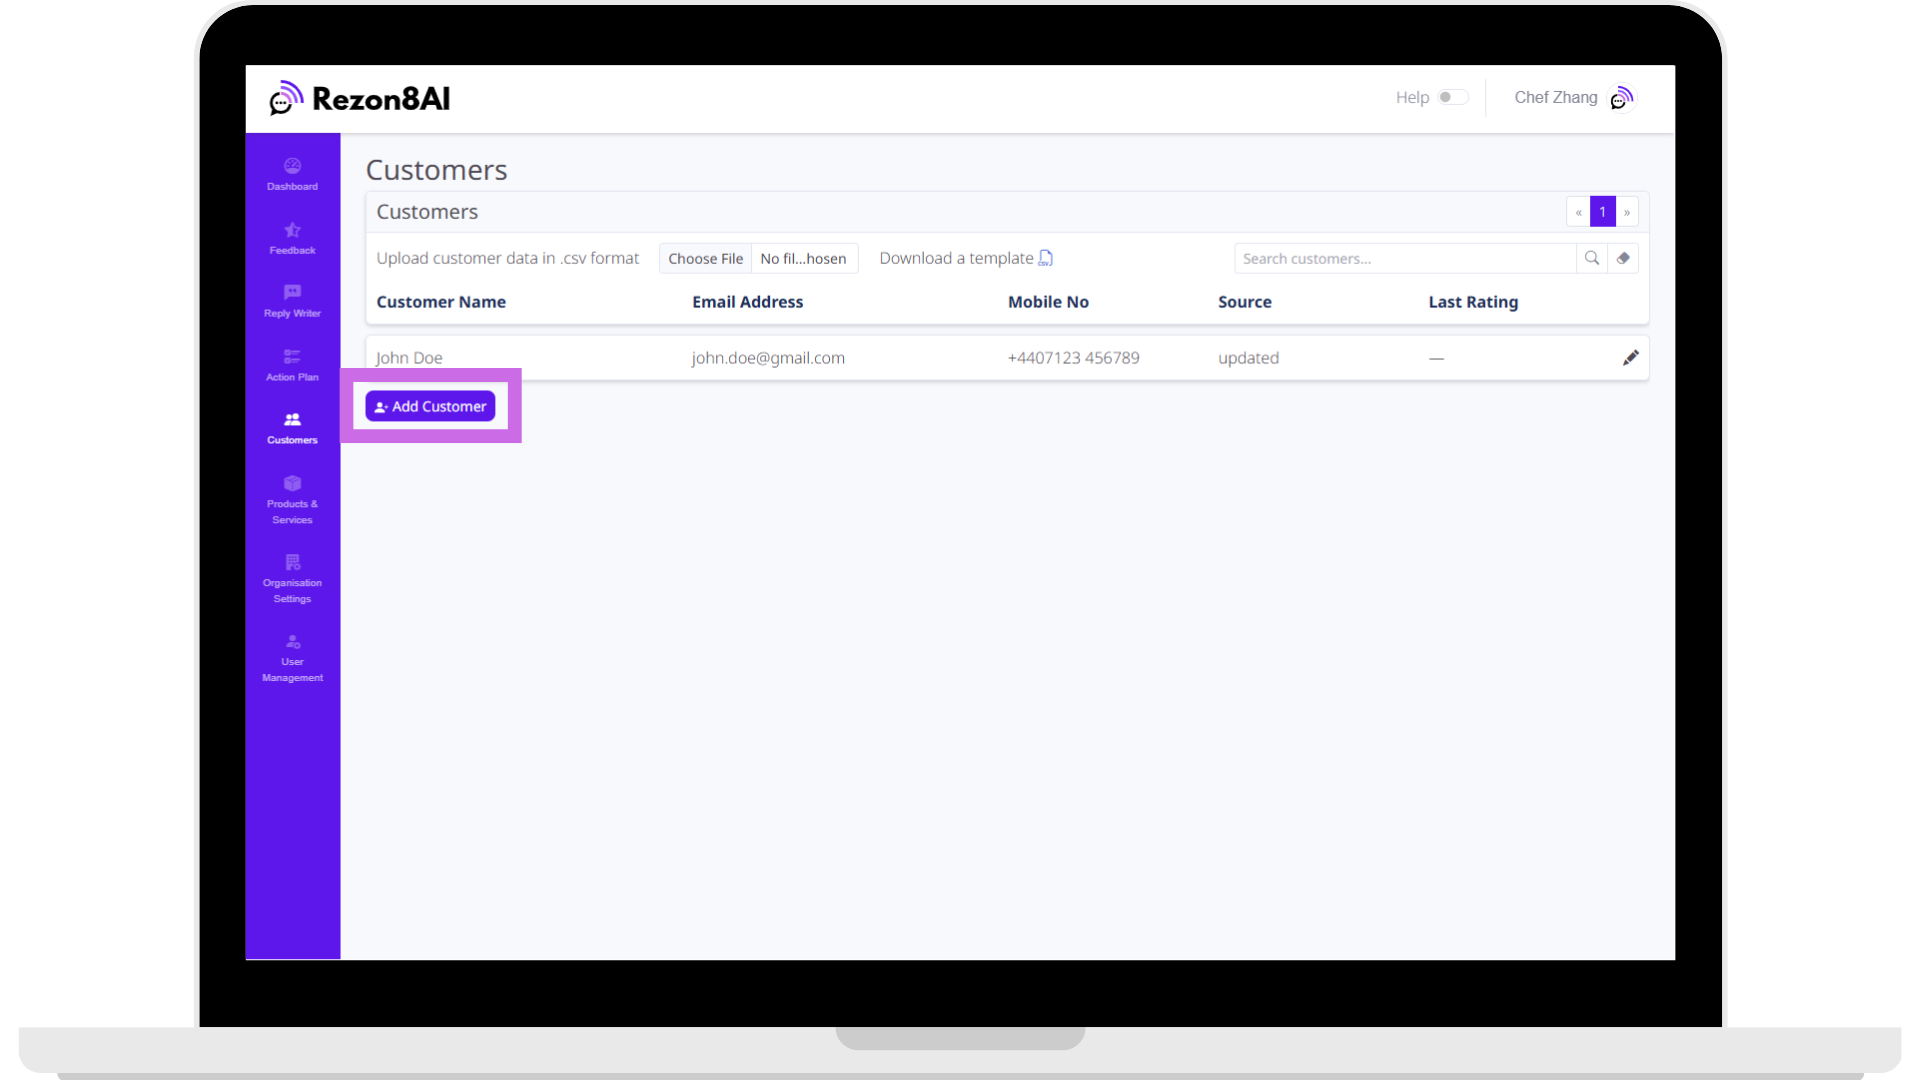
Add a New Customer Manually
Use this when you want to add a customer one at a time (e.g., after completing a job or service).
- Click the Add Customer button in the bottom-left of the screen.
-
In the pop-up form:
-
Enter the customer’s first name and surname.
-
Add their company name (optional).
-
Fill in their email address and mobile number.
-
Enter the customer's address, including postcode and country.
-
-
Set how you want to contact them:
-
Toggle on Email Messages and/or SMS Messages.
-
Tick Marketing Opt-In if they’ve given permission.
-
-
Click Create Customer to save.
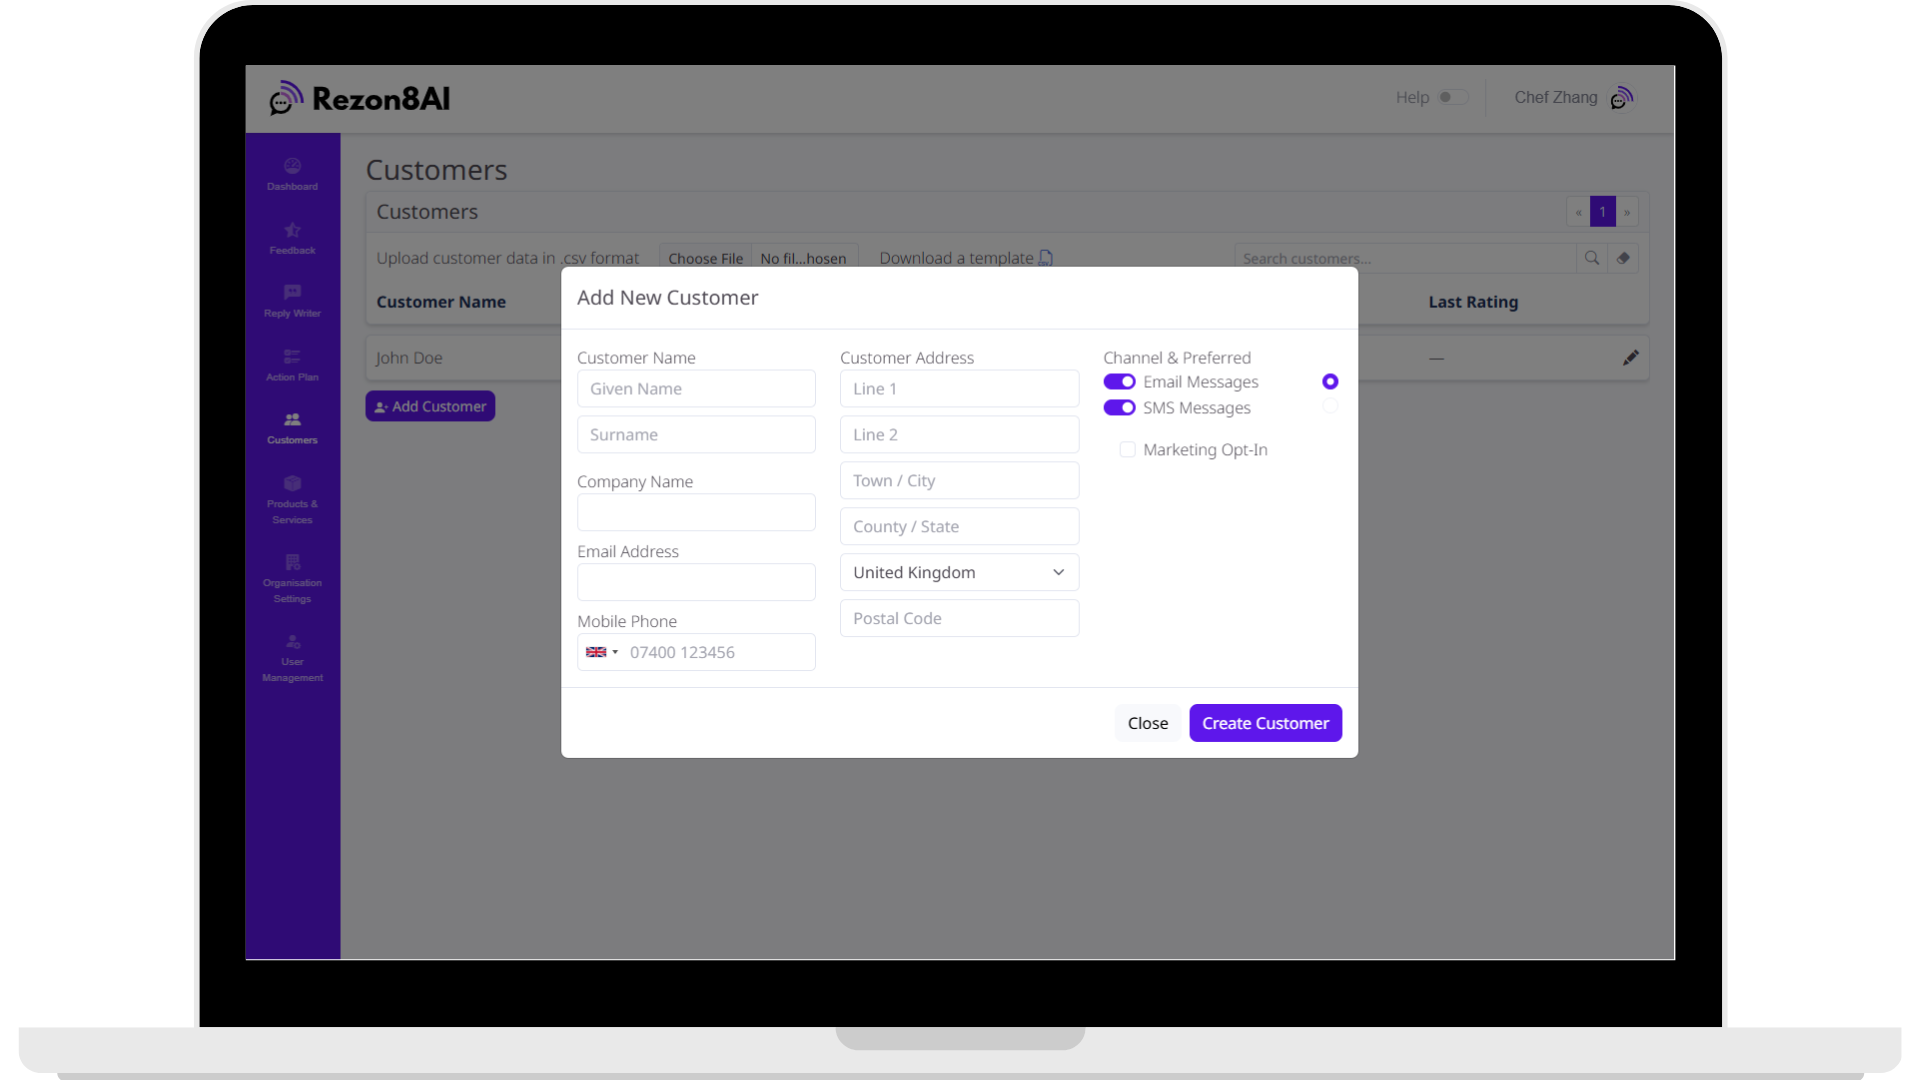
💡 Why this matters: This ensures you can send review requests by email or SMS. Accurate contact info improves delivery and response rates.
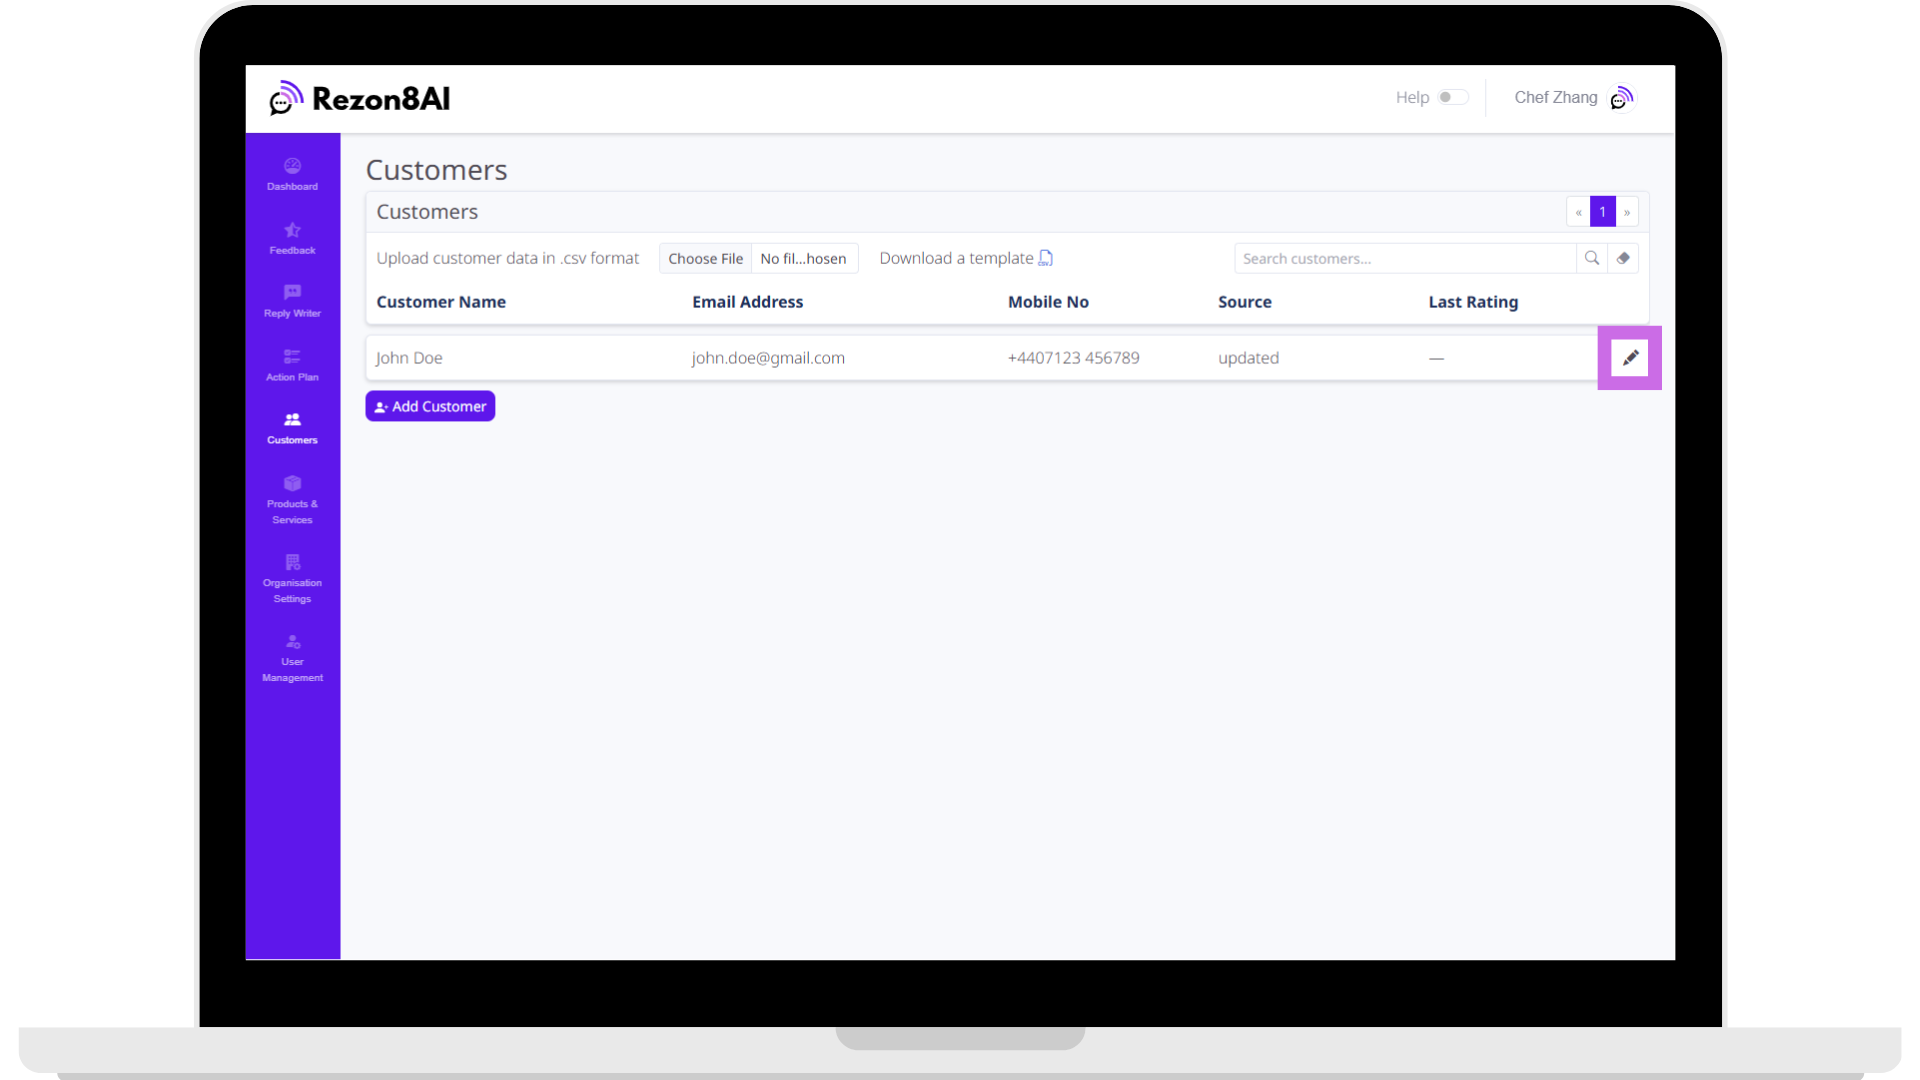
Edit an Existing Customer
Use this when a customer’s contact details change, or if you want to add missing data like a mobile number.
-
Find the customer in the list (you can search for them – see next section).
-
Click the pencil icon at the far right of their row.
-
Update any details in the form that pops up.
-
Click the Save Changes button.
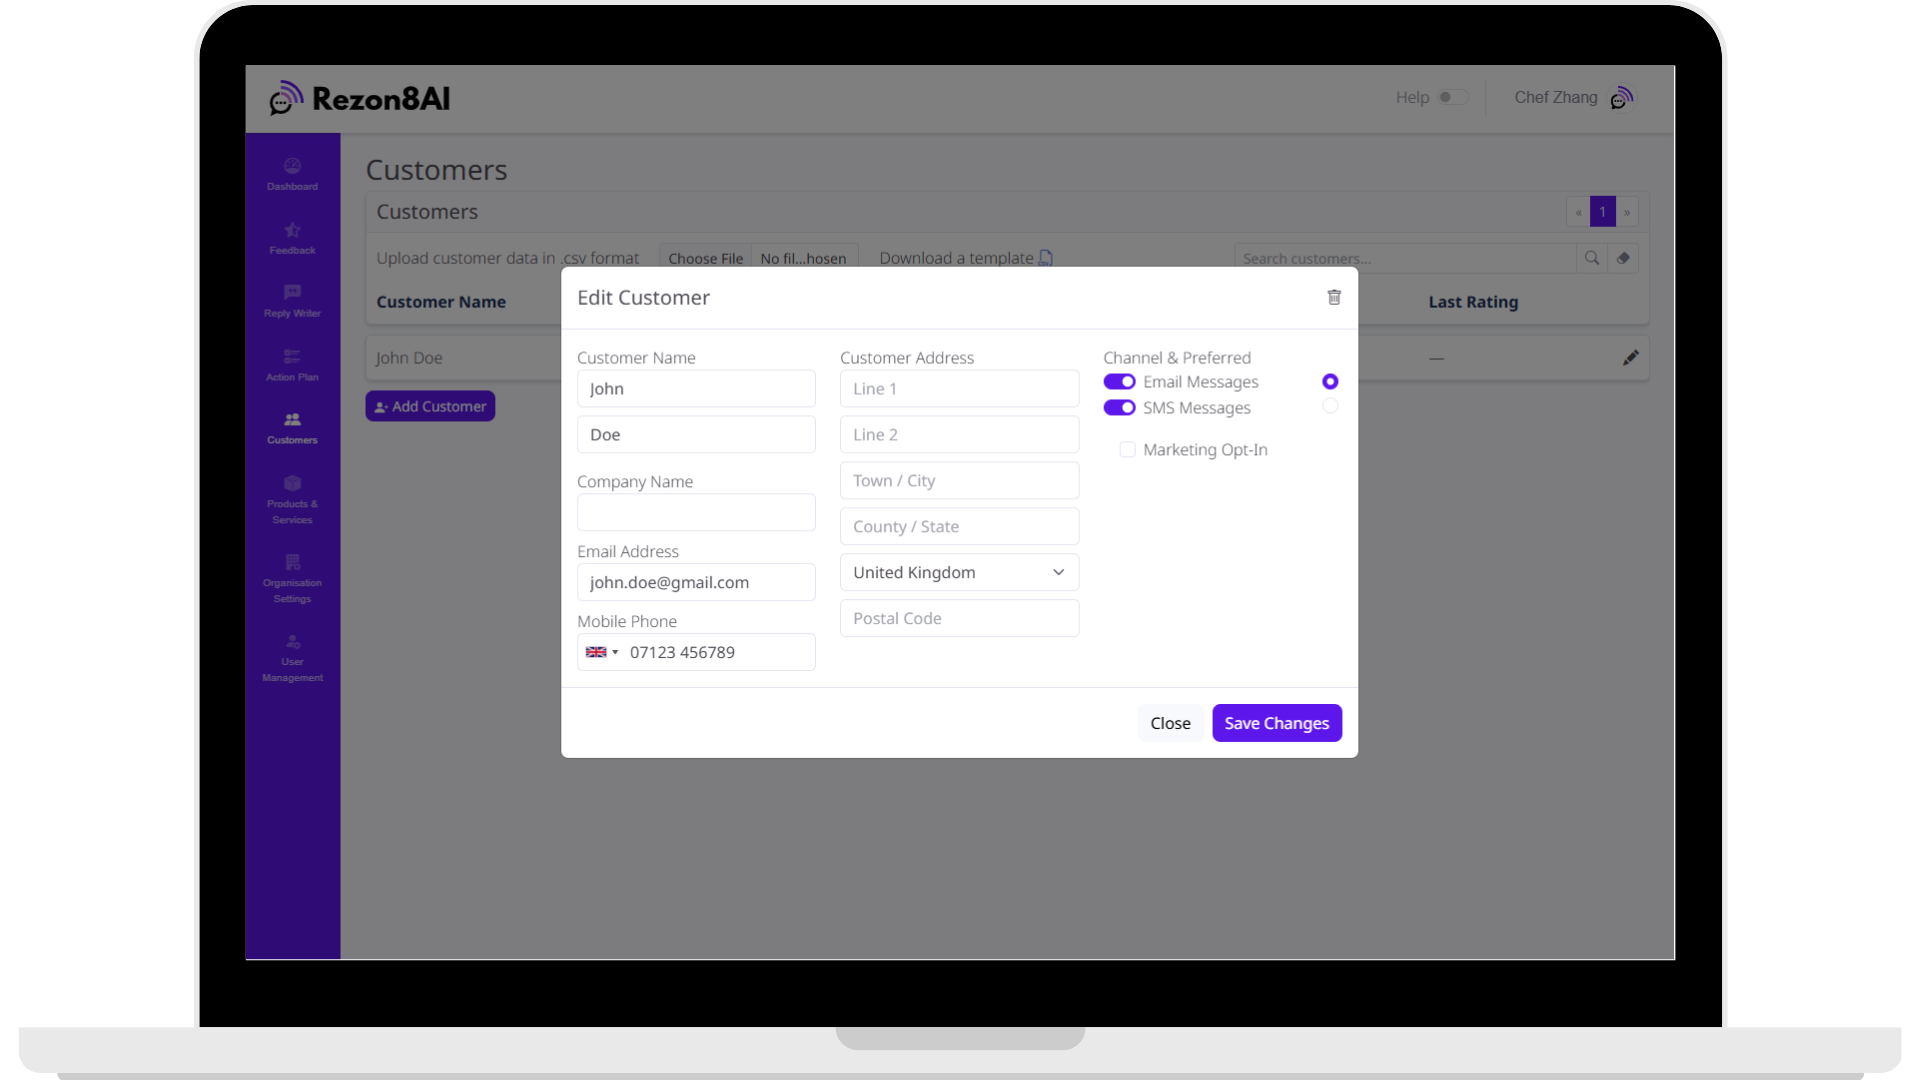
📌 Tip: You can also change their communication preferences (e.g., switch from email to SMS).
Search for a Customer
When your customer list gets long, use the search bar to quickly find someone by name or email.
-
Go to the top right of the page.
-
Type part of the customer’s name or email into the search box.
-
Press Enter or click the magnifying glass icon to search.
-
To reset the list, click the eraser icon next to the search box.
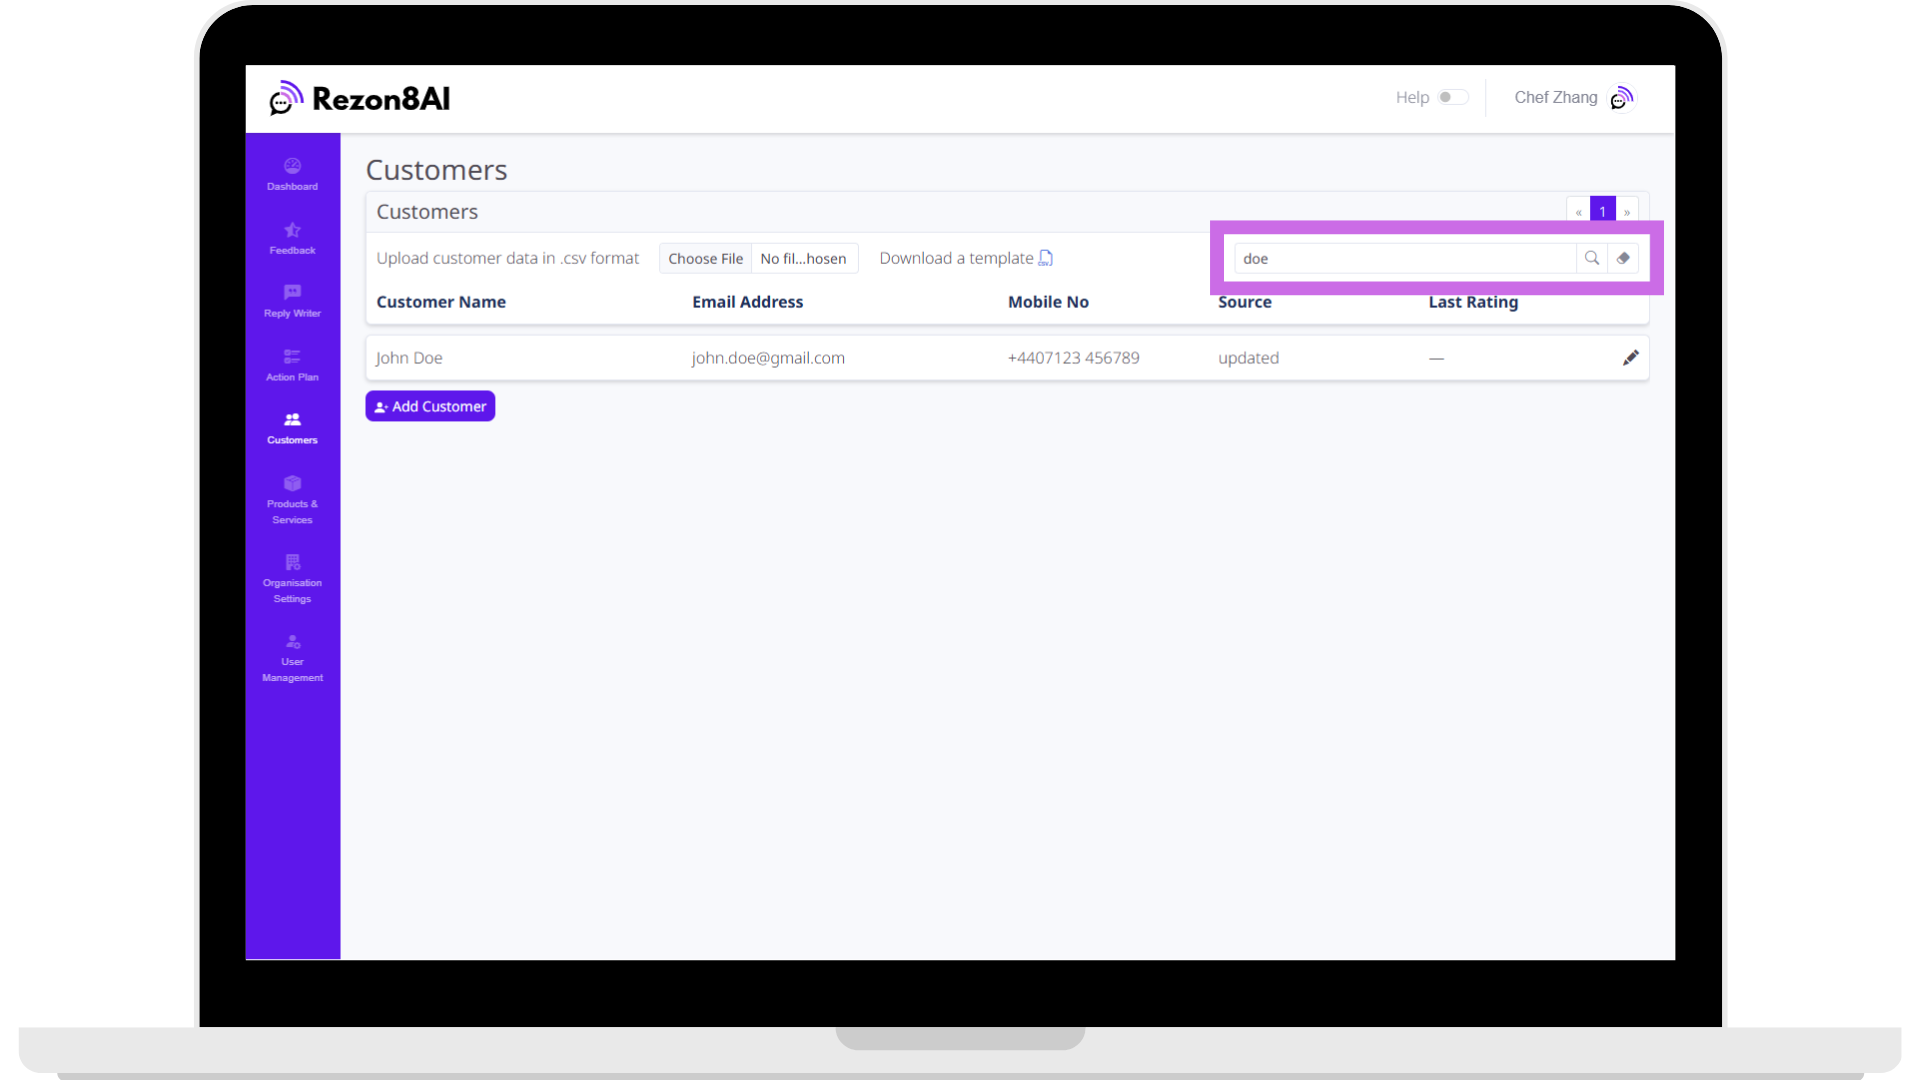
🔎 Why this matters: This helps you quickly check contact details or send a review request without scrolling.
Import Customers via CSV
If you have a list of customers (e.g. from another system or spreadsheet) you can upload them all at once.
- At the top of the Customers page, download the template by clicking the icon to get the correct format.
-
Fill in the template with your customer info.
-
Click Choose file, then select your completed
.csvfile. -
The system will upload and process your customer list.
💡 Why this matters: This saves time when adding multiple customers and ensures data is structured correctly.
Understand the Customer List Columns
Each row on the Customers page shows a customer and their details:
-
Customer Name – Person or business name, if there is no business name then a name will be constructed from the person's given name and surname.
-
Email Address – Used for sending email review requests.
-
Mobile No – Used for SMS review requests.
-
Source – Where or how this customer was added.
-
Last Rating – Shows the most recent review score (if applicable).
-
Pencil Icon – Opens the edit form.
💡 Why it matters: These columns give you a quick overview of who your customers are, how to contact them, and what kind of feedback they've left.
📌 Pro Tips
-
📱 Add mobile numbers whenever possible so you can use SMS review requests (which often get higher response rates).
-
🗂️ Keep your data clean—avoid duplicate records by searching before adding new customers.
-
🔒 Respect data laws—only opt customers into marketing if they’ve given permission.
Overview of the Feedback Section
The Feedback section of the Rezon8AI platform is designed to help businesses easily collect, track, and act on customer feedback. It’s split into two main panels at the top (for sending requests and generating QR codes), and a comprehensive feed at the bottom (for monitoring what’s come in). Here’s a breakdown of each part:
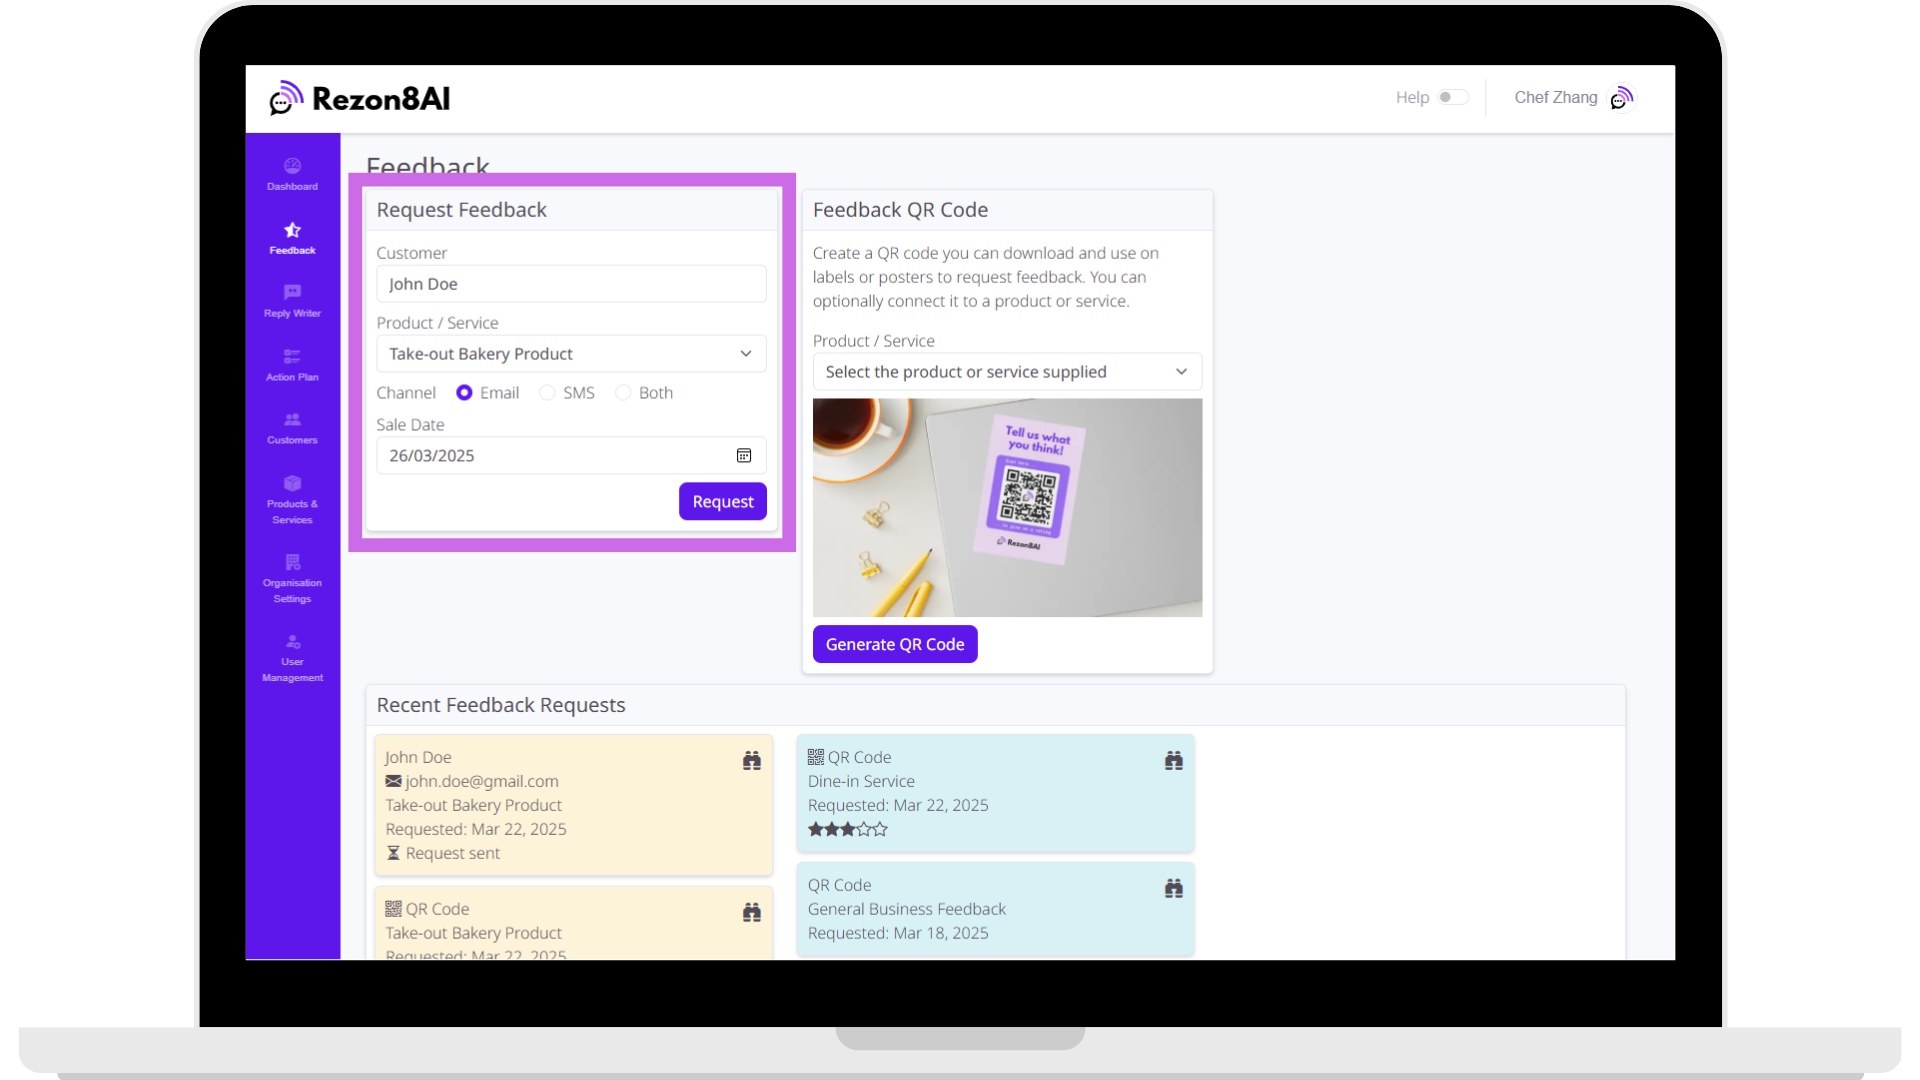
Request Feedback Panel (Top Left)
This is where you directly request customer feedback. It contains:
-
Customer field who you want feedback from
-
Product / Service dropdown what you want feedback about
-
Channel selection how you want to send it (it defaults to the selected customer's preferred channel)
-
Sale Date when you provided the thing you want feedback about
-
Request button send it
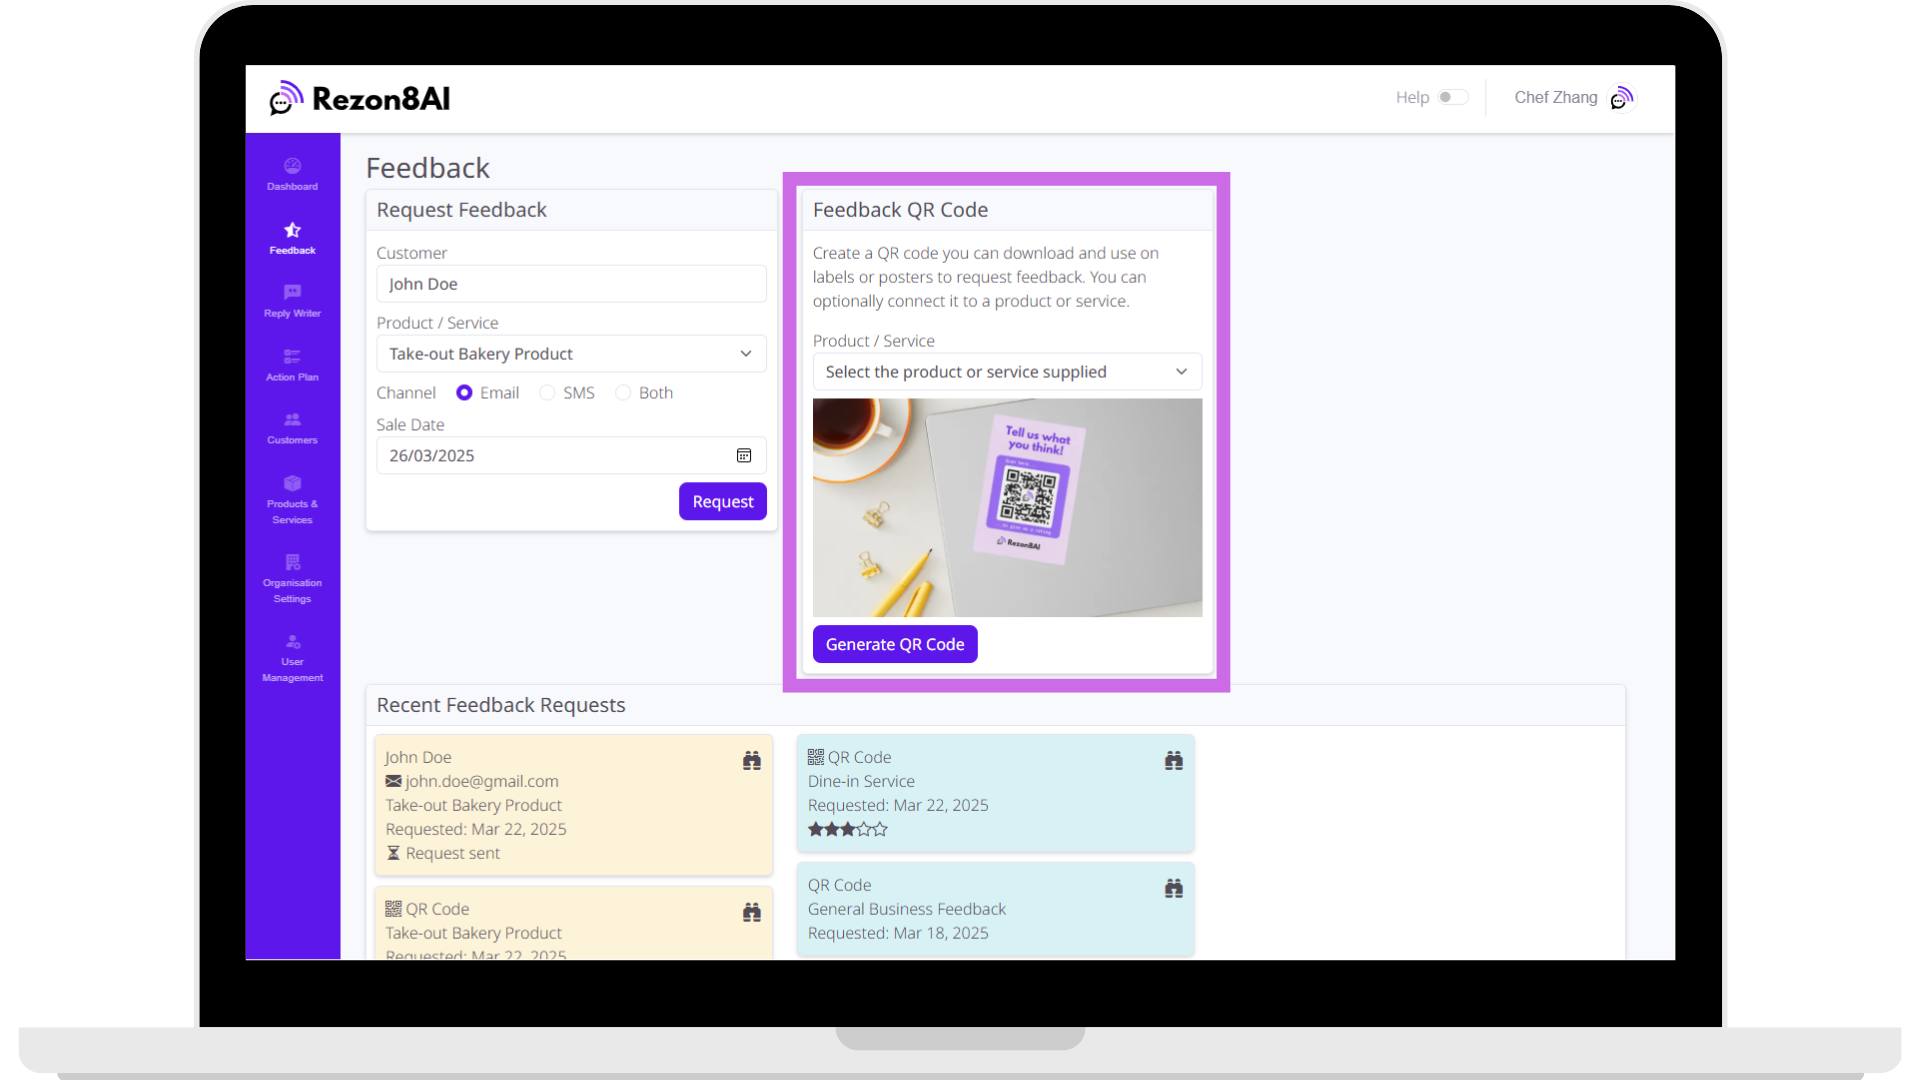
Feedback QR Code Panel (Top Right)
Perfect for offline or in-person use, this lets you generate a scannable QR code for collecting feedback.
-
Product / Service dropdown: You can optionally link the QR code to a specific product or service. If left blank, the feedback will be general.
-
Generate QR Code button: Creates the QR image instantly.
-
Download Icon (appears below the QR code after it’s generated): Clicking it downloads the QR code as an SVG file, so it can be printed or resized without losing quality—for posters, stickers, or receipts.
Recent Feedback Requests (Bottom Section)
This panel shows a timeline of feedback requests and responses, organized by type and status.
This section of Rezon8AI is your command center for customer sentiment—automating review collection, intercepting problems, and giving you tools to resolve them efficiently.
How to Request Feedback From a Customer
Use this when you know the customer and want to follow up after a sale or service.
Step-by-step:
-
In the Request Feedback panel (top-left), start typing the customer’s name into the Customer field. The system will show matching contacts from your records. Keep typing to narrow it down. Then click on the required customer.
-
Choose the product or service they received. If you leave this blank, Rezon8AI will ask for general feedback about your business.
-
Choose a channel: Note that this will default to the customer's preferred channel.
-
Email: Best for customers who regularly check email and have shared their address with you.
-
SMS: Ideal for faster responses or mobile-first customers.
-
Both: Maximizes your chances by sending to both channels (counts as one request per channel).
-
-
Check or update the sale date (this defaults to today).
-
Click Request to send the review invitation.
💡 Tip: Use SMS for quicker engagement. SMS typically gets higher open and response rates than email.
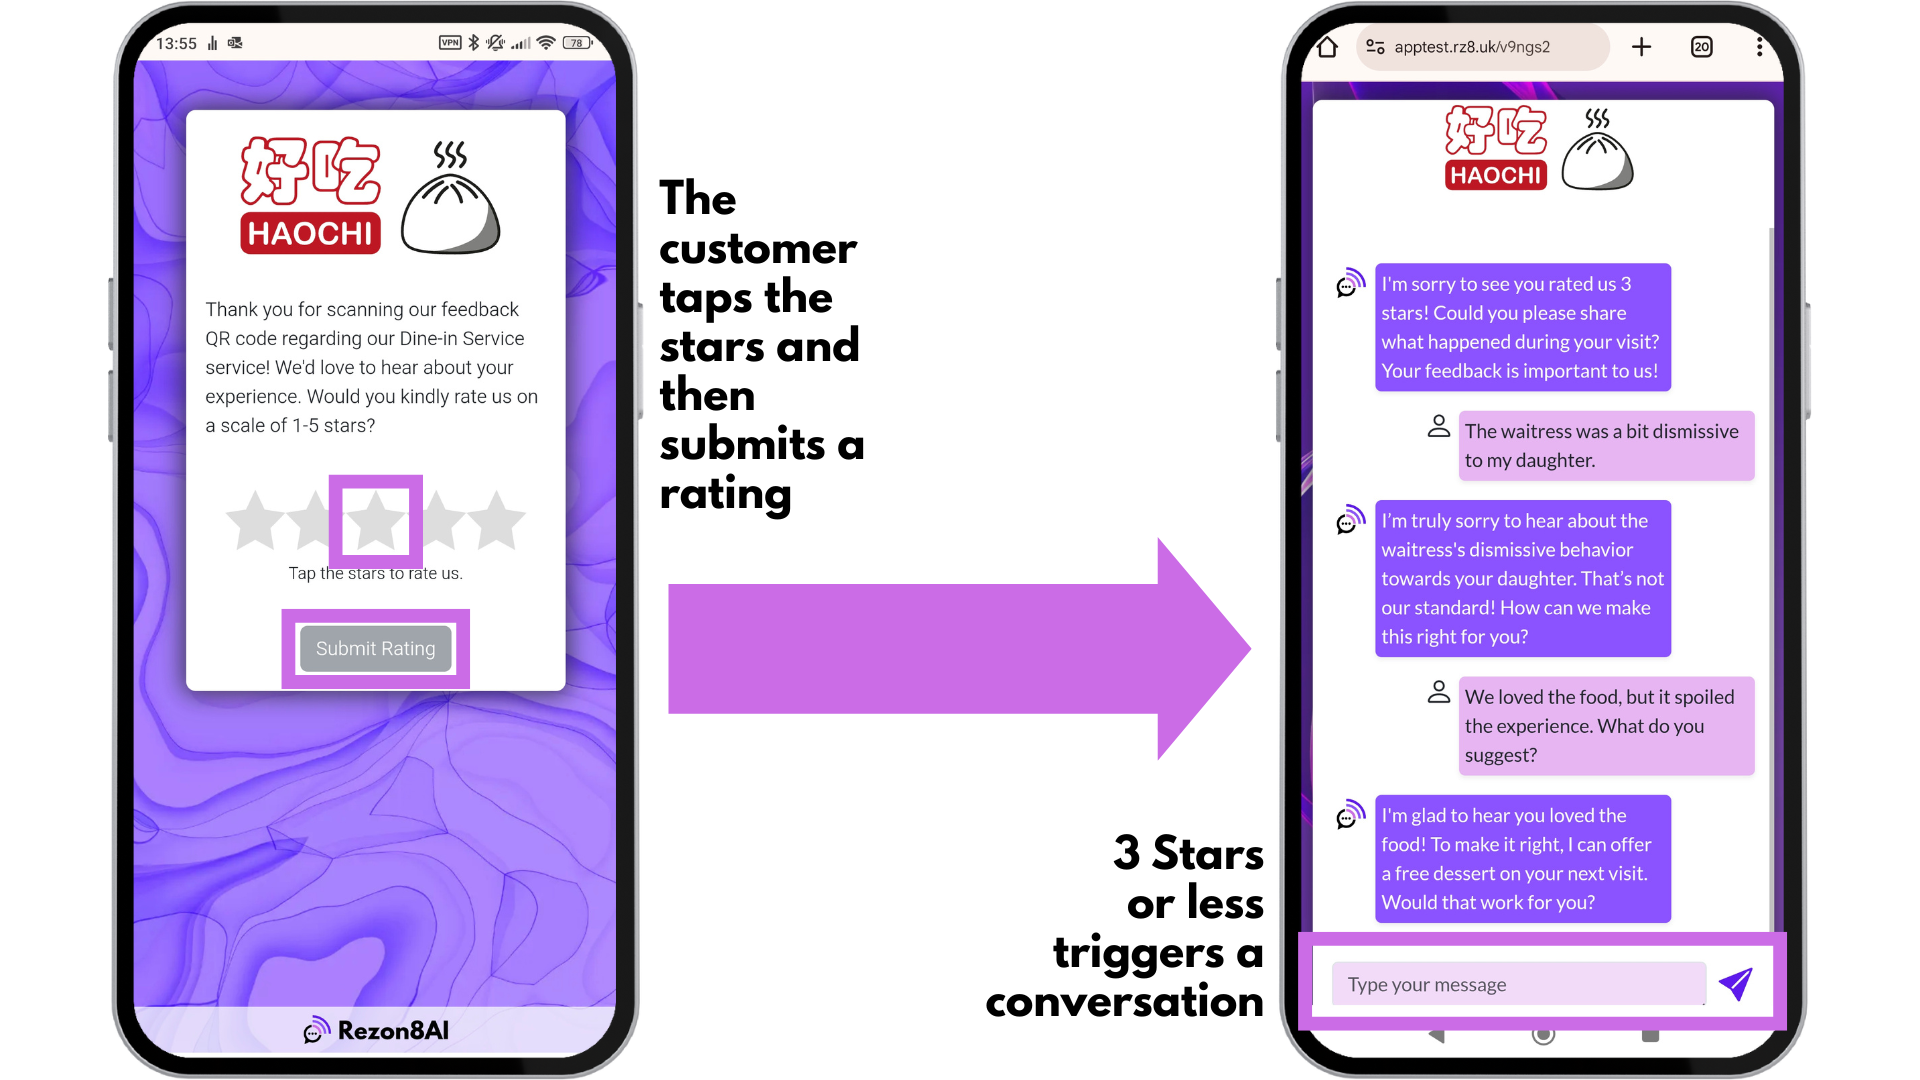
What the Customer Sees
When you send a feedback request to a customer by email or SMS (or both) they will receive a branded message and request to leave feedback or rating.
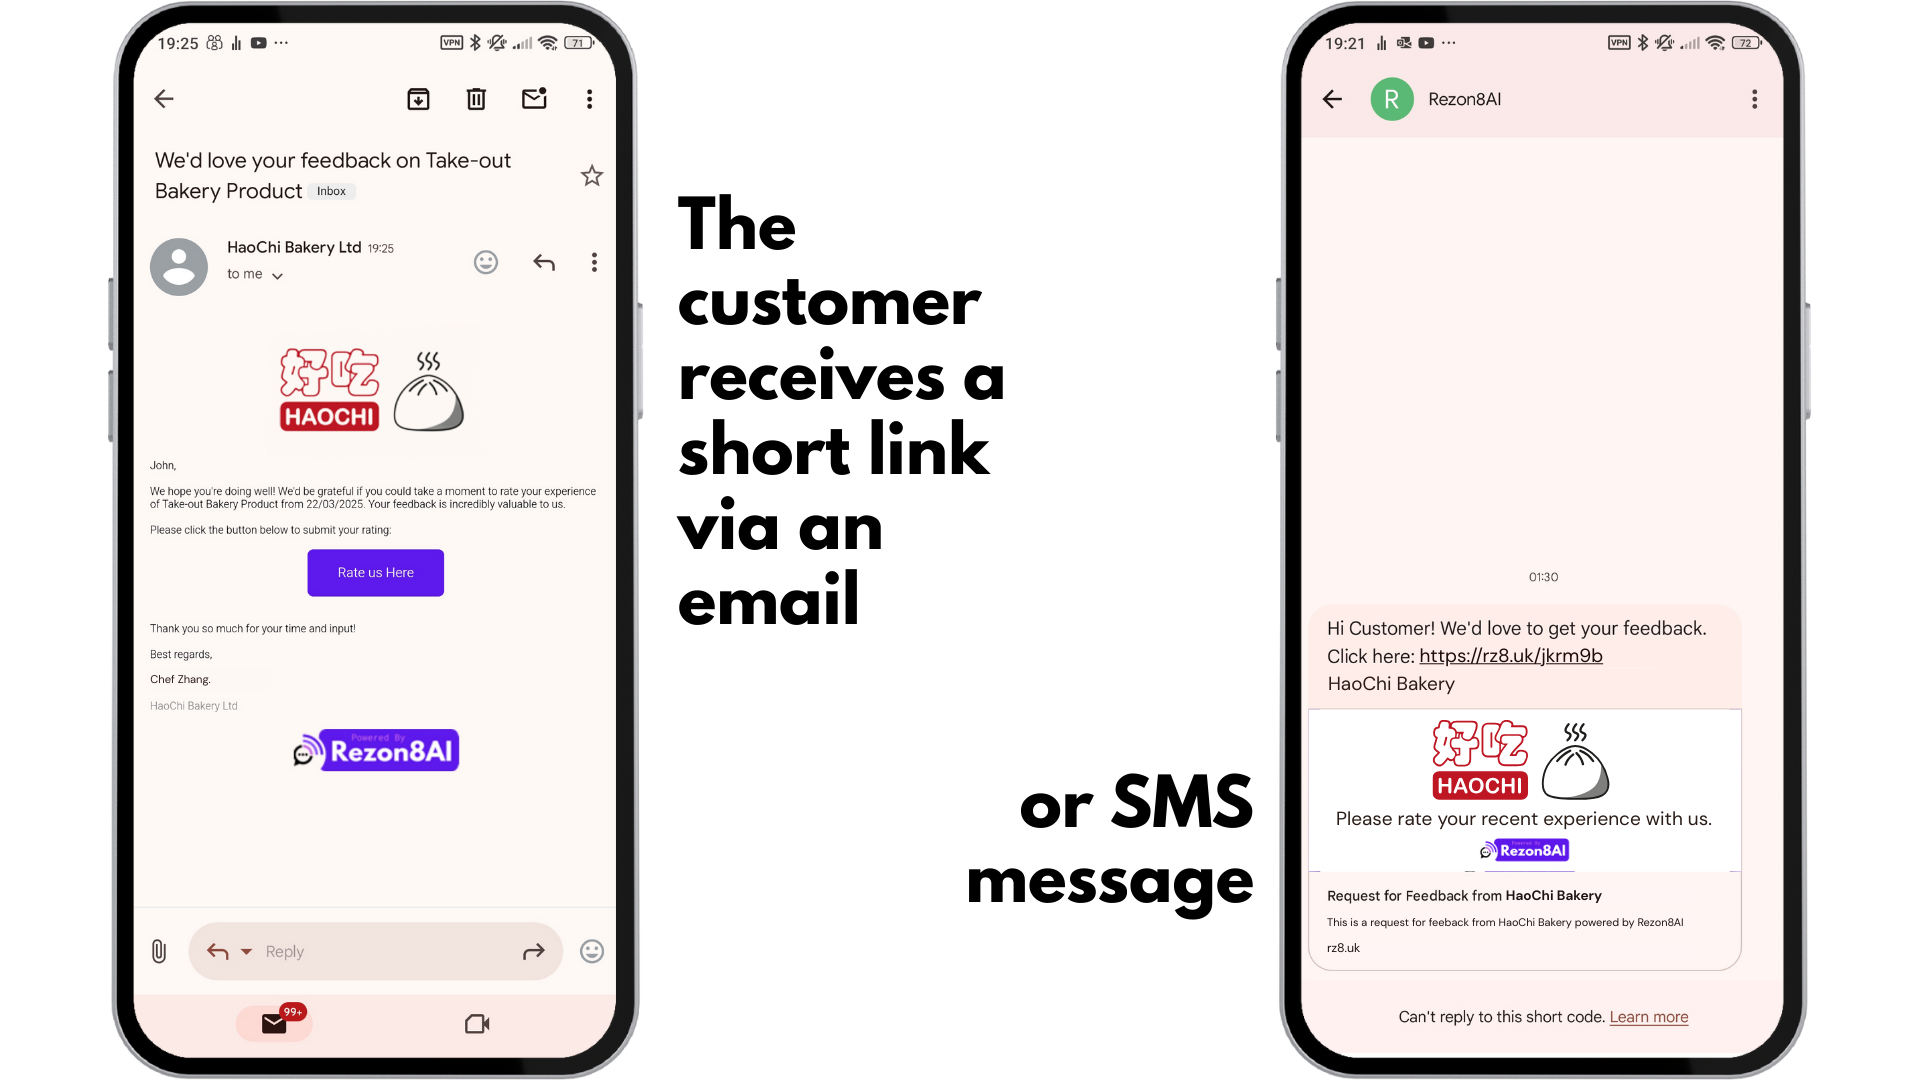
When they click on the link in an SMS message or button in an email, they are taken to a very simple rating page with 5 stars. When they touch a star (or click with a mouse) the stars up to that one change to yellow and the Submit Rating button enables.
If they rate with 3 stars or less, the page immediately switches to a chat screen, if the customer name is known, and the product or service is known they are addressed personally and specifically about that particular product or service. Otherwise it may be a combination of unknown customer and/or unknown product/service.
How to Generate a QR Code
Use this method for in-person or printed interactions—e.g., at a front desk, printed on receipts, menus, packaging, or signage.
Step-by-step:
-
Go to the Feedback QR Code panel (top-centre).
-
Select a product or service if you want feedback about something specific. Or leave it blank for general business feedback. Note: if you have a Growth or Accelerate plan a QR code can be tied to a location.
-
Click Generate QR Code.
-
A scannable QR code appears. Click the download icon (bottom right of the QR code panel) to save it as a scalable vector graphic
.svgfile..svgfiles can be resized without quality loss—great for printing in any size.
💡 Tip: Use QR codes in high-traffic physical locations to capture casual or walk-in feedback.
How to Monitor Recent Feedback
The bottom section of the Feedback page shows Recent Feedback Requests, where you can view all the recent feedback requests.
What you see:
Each card shows:
-
Whether the request was a QR code or direct customer request
-
What product or service was involved
-
Whether the customer has responded or not
-
Star rating if the customer left one
What you can do:
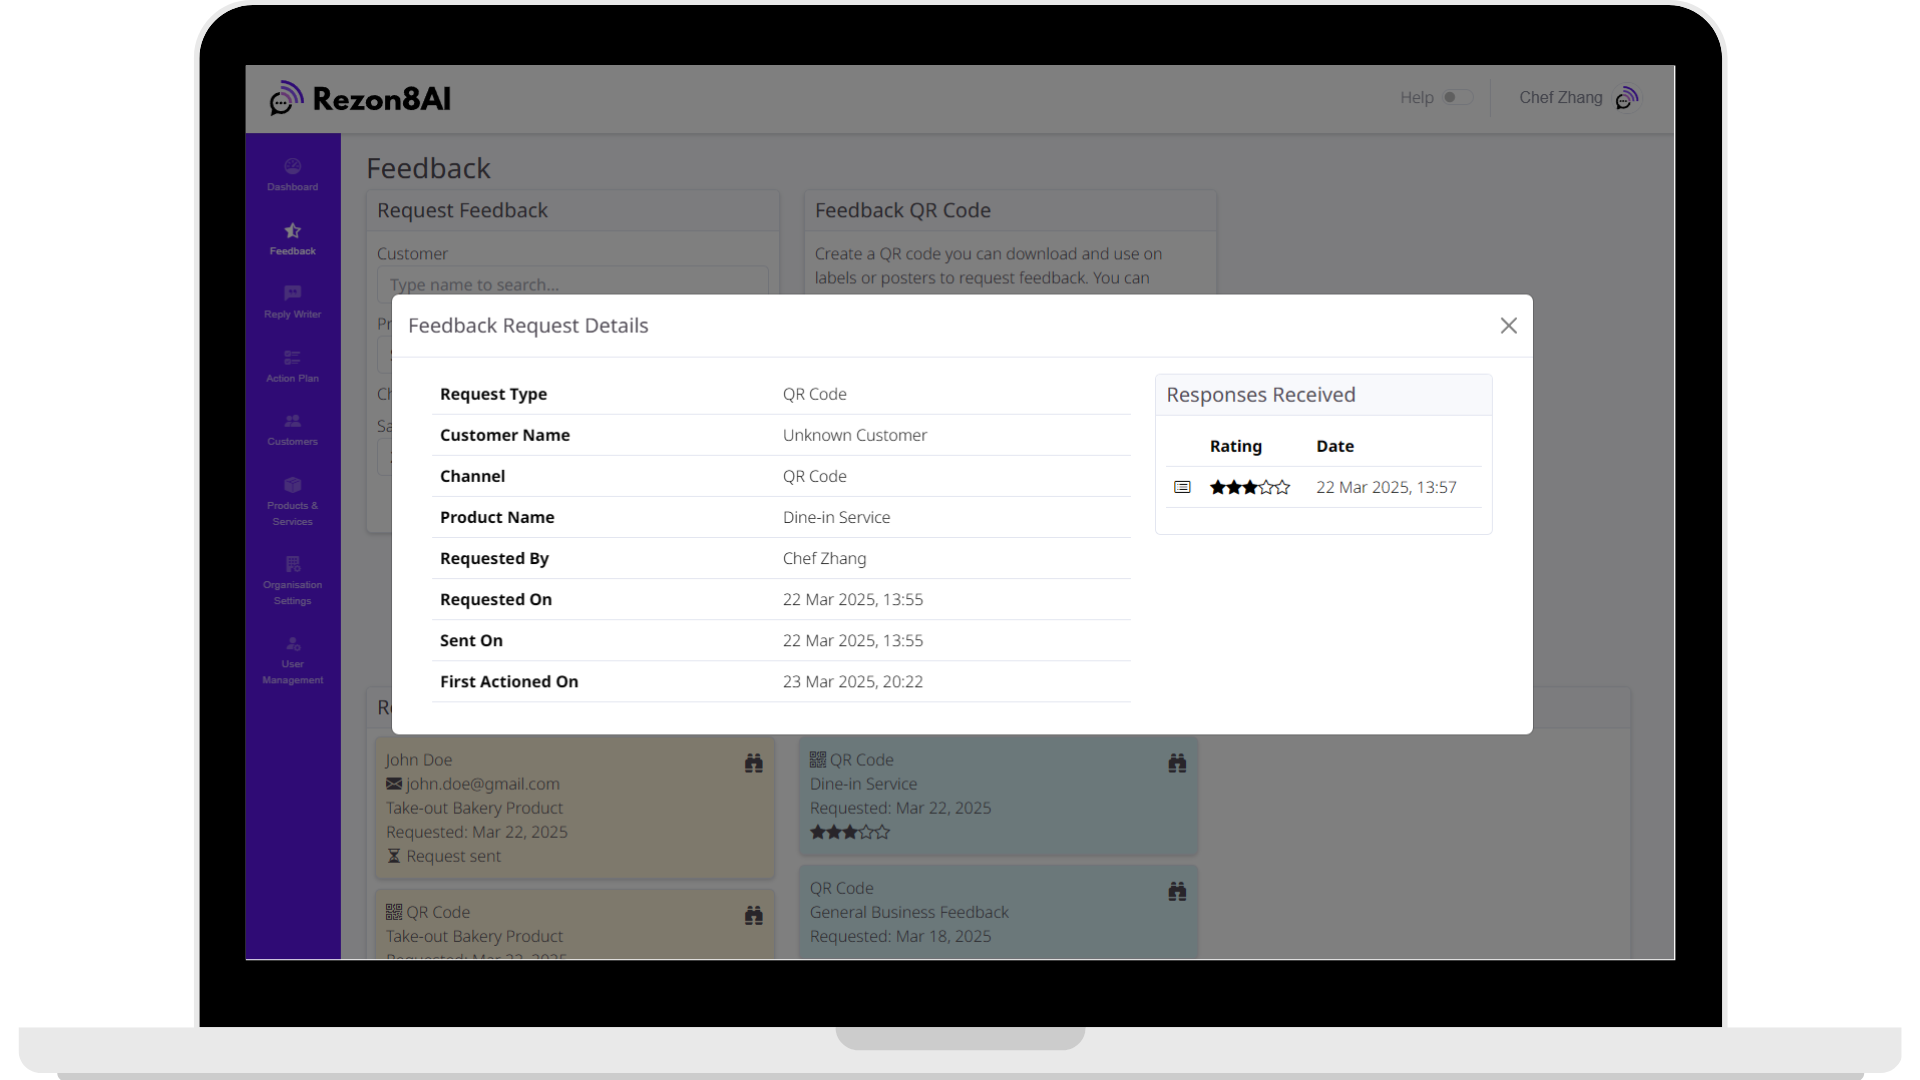
-
Click the binoculars icon to see detailed information about that request:
-
When it was sent
-
What channel it used
-
Whether and when the customer responded, or if more than one response has been received.
-
-
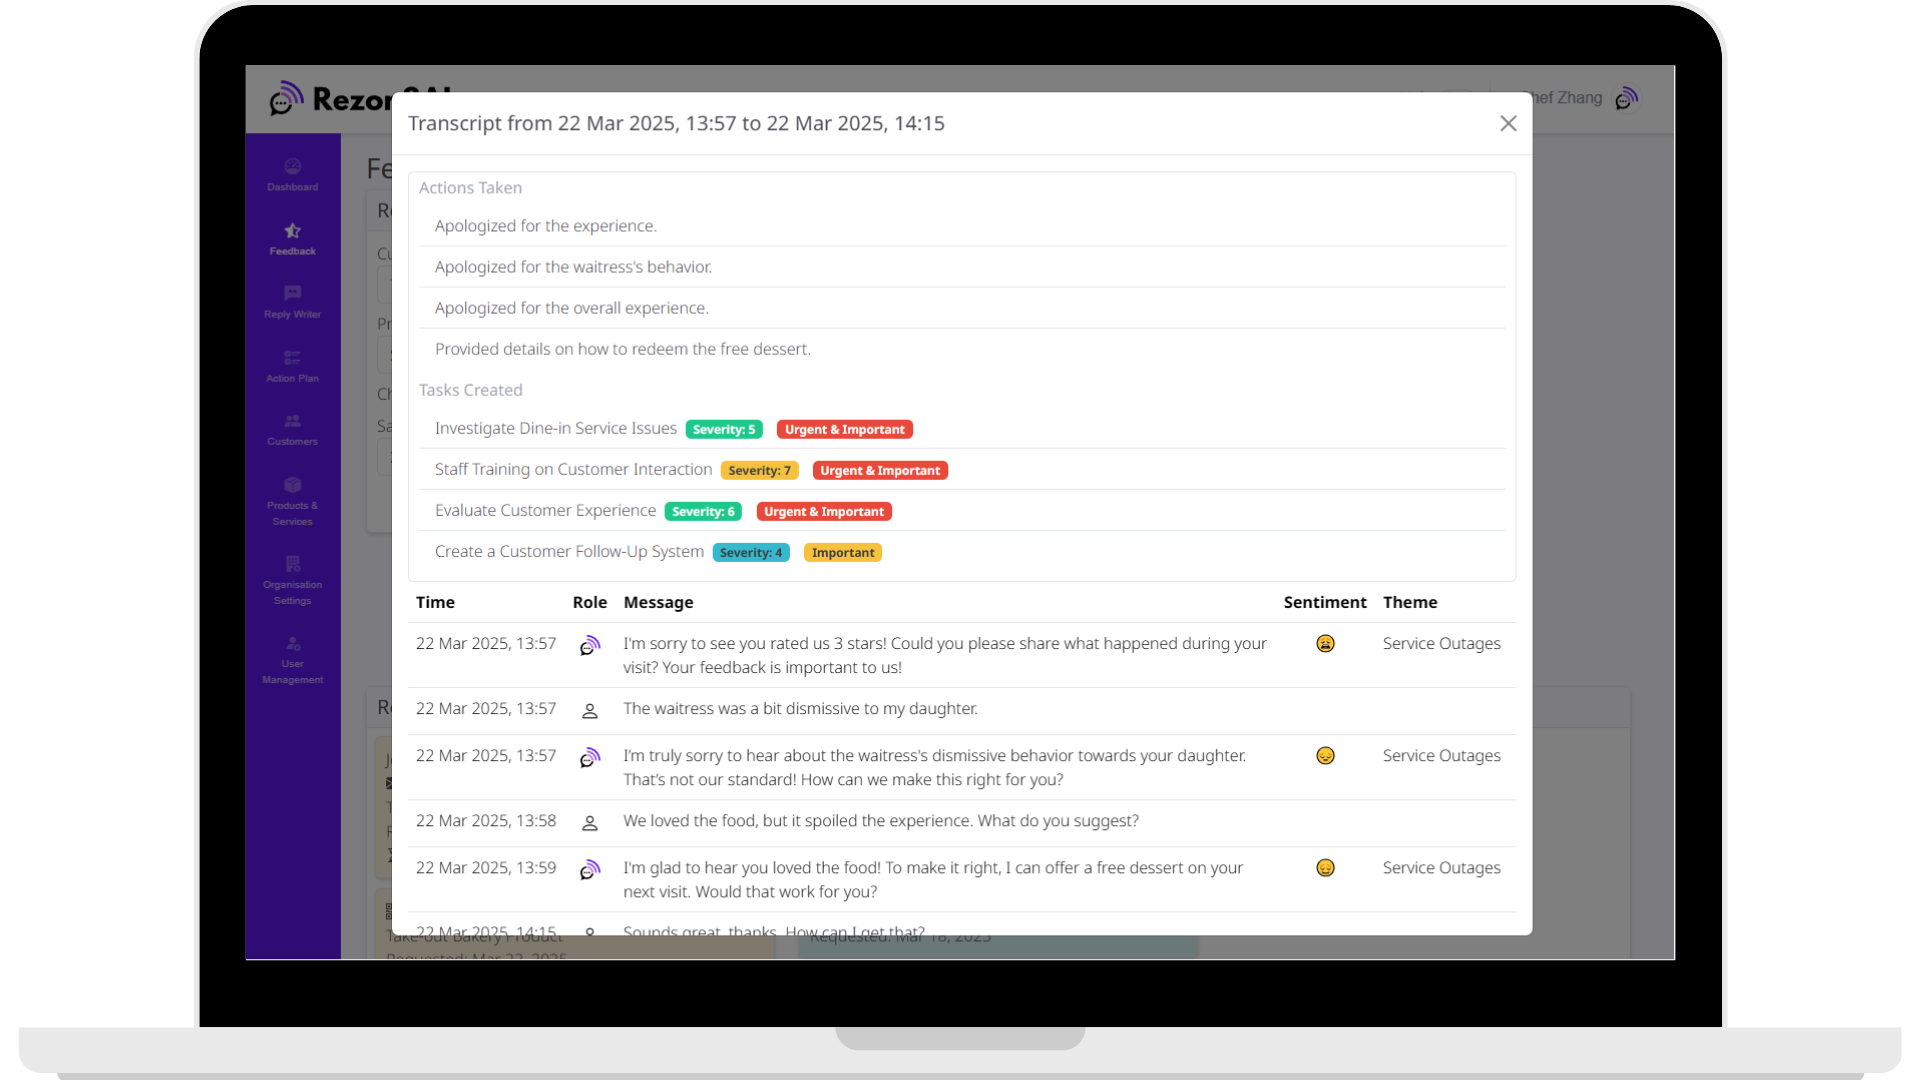
If the customer engaged with the AI chatbot, a chat transcript icon will appear:
-
Click it to view the AI conversation that followed the review
-
See what the customer said, how the AI responded, and what actions or tasks were created to help resolve the issue
-
💡 Tip: Use this panel daily to stay on top of new feedback. Investigate negative reviews right away using the transcript viewer and take any needed follow-up action.
When to Use Each Feedback Method
| Scenario | Best Method | Why |
|---|---|---|
| You just completed a job or sale for a known customer | Email or SMS Request | More personal and trackable |
| You have foot traffic (e.g., shop, cafe, front desk) | QR Code | Easy for anyone to scan with no contact info |
| You want to boost public reviews quickly | SMS + Email or QR | Higher reach and open rate |
| You want feedback about a specific service | Select product/service in request or QR form | Lets you track satisfaction per service/product |
| You're launching a new product | QR or SMS with product selected | Quickly gather reactions and spot problems |
What Happens After Feedback is Collected
Once a customer submits a review:
-
If the rating is 4 or 5 stars, the AI encourages them to post it on one of your preferred public review sites (e.g., Google Business, Facebook).
-
If the rating is 3 stars or below, the AI starts a private chat to understand what went wrong and resolve it.
-
You can view this conversation by clicking the chat transcript icon on the request card.
-
The AI may automatically create action items or tasks based on what the customer says (like “Investigate rudeness to customer”).
-
📌 Final Tips
-
Send requests regularly—don’t wait for reviews to come in on their own.
-
Monitor the bottom panel to catch issues early and follow up.
-
Use feedback trends to improve your service and customer experience.
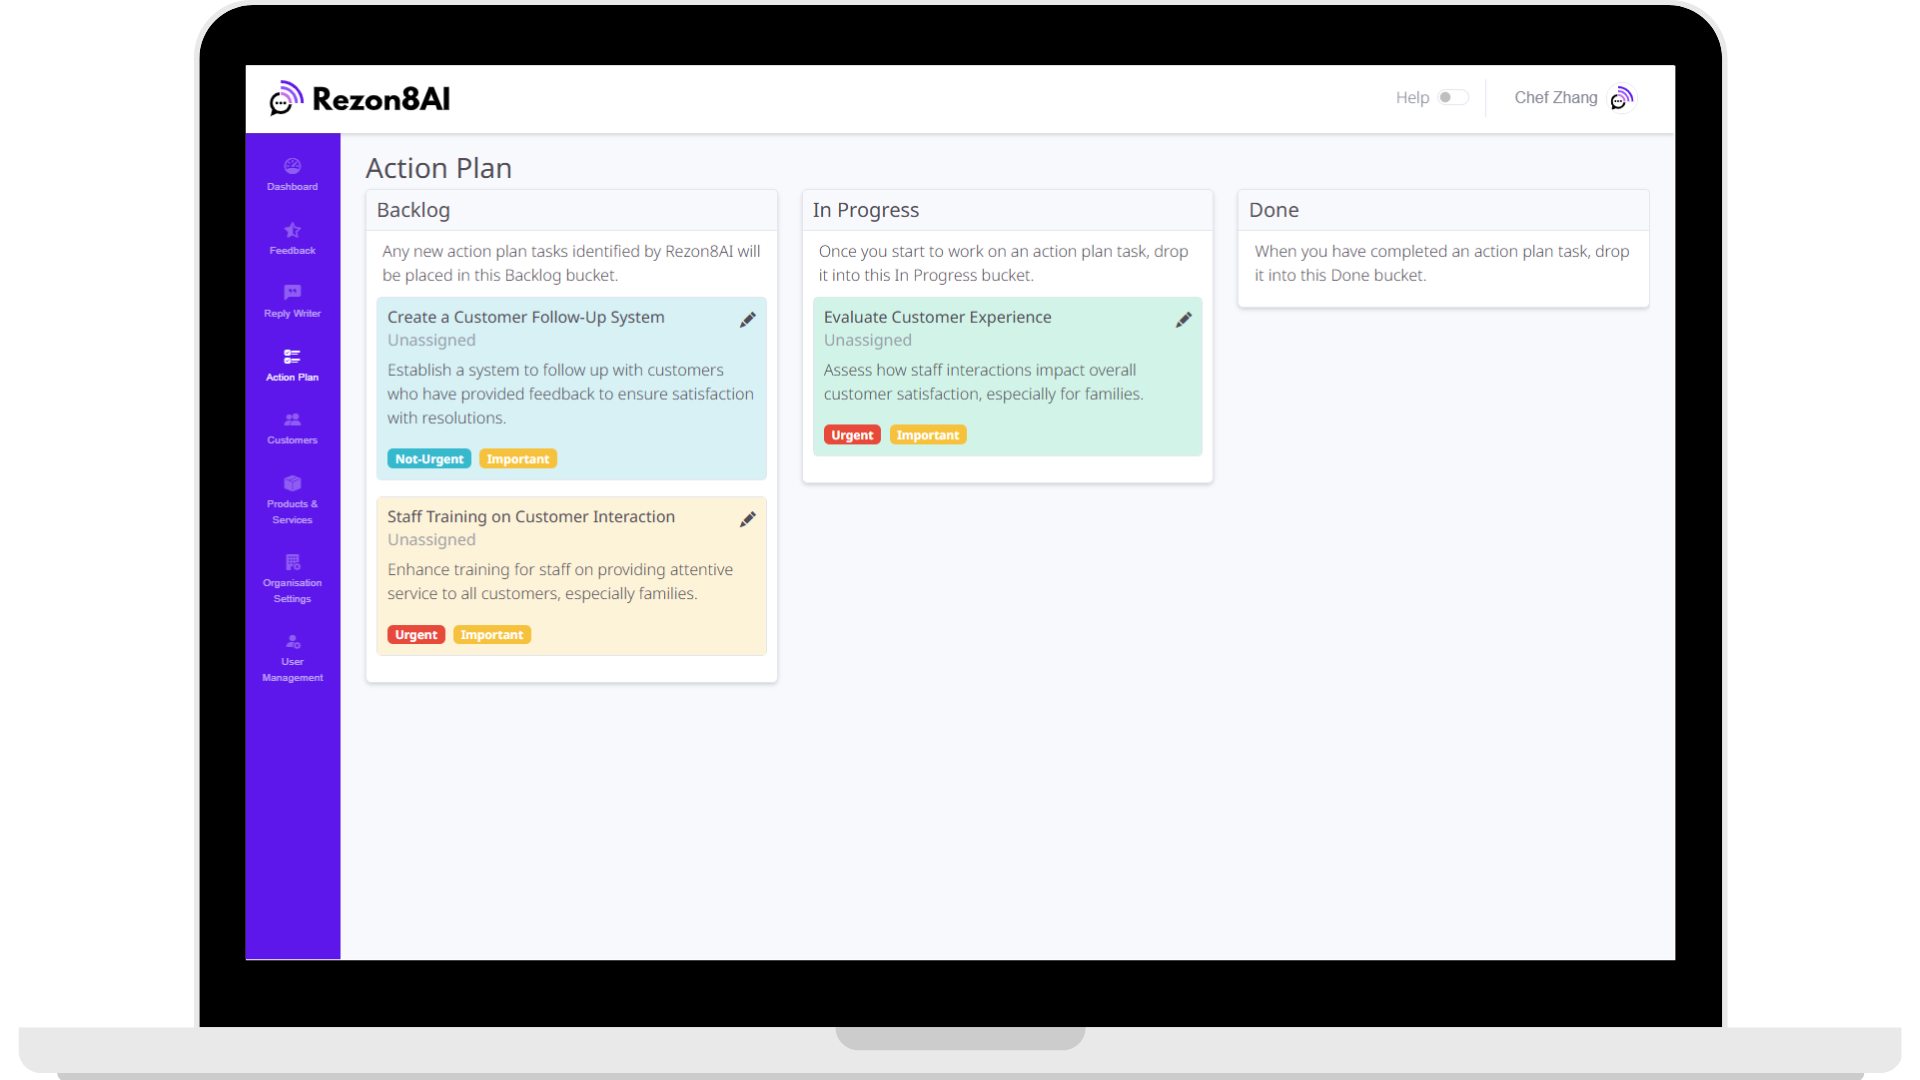
What Is the Action Plan Board?
The Action Plan board is a kanban-style task manager inside Rezon8AI that displays tasks automatically created from customer conversations—specifically when a customer gives a low rating (below 4 stars) and the AI identifies an issue that needs addressing.
he board is divided into three columns (called “buckets”):
🔹 Backlog
-
This is where new tasks land by default.
-
These are tasks that need to be reviewed, assigned, or actioned.
-
Task cards include the title, description, urgency, importance, and whether someone is assigned.
🔸 In Progress
-
Tasks here are actively being worked on.
-
You move a task here by dragging and dropping it.
-
Useful for managing workload across a team—lets everyone see what’s being worked on.
✅ Done
-
Completed tasks are dragged here.
-
After 30 days, done tasks disappear from the board to keep things tidy.
-
But—they’re not deleted. They’re kept in the system and contribute to ongoing AI learning to detect patterns and trends.
🧠 Bonus: What Happens in the Background
All tasks come from AI-analyzed customer conversations. If a customer expresses frustration, anger, confusion, etc., and provides useful feedback, the AI:
-
Creates one or more tasks
-
Sets severity and priority
-
Logs everything for ongoing analysis
These tasks help Rezon8AI surface not just individual issues, but business-level trends—giving you strategic insight, not just operational reminders.
In the background the AI looks at all the open tasks, and if there is one substantially similar to a new one it was about to add it tags this conversation to the task and bumps up the severity or priority. This helps to identify recurring themes that need addressing more urgently.
What’s on a Task Card?
Each Task Card Includes:
-
Title – A short summary of the issue.
-
Description – What the task involves.
-
Assignee – Who is responsible (Unassigned by default).
-
Urgency & Importance Labels – Show how critical the task is.
-
Background Colour – Shows how severe the issue is.
Tasks have priority codes from 1 to 4, based on the classic Eisenhower Decision Matrix:
| Priority Code | Urgency Label | Importance Label | Action Suggestion |
|---|---|---|---|
| 1 | 🟥 Urgent | 🟧 Important | Do it immediately |
| 2 | 🟦 Not Urgent | 🟧 Important | Schedule it |
| 3 | 🟥 Urgent | ⬛ Not Important | Delegate if possible |
| 4 | 🟦 Not Urgent | ⬛ Not Important | Consider dropping it |
These labels appear as coloured badges on each task card, helping you prioritize at a glance.
- 🟥 **Urgent & 🟧 Important** = Needs immediate attention.

- 🟧 **Important but 🟦 Not Urgent** = Schedule soon.- Task Colours – Background color reflects the severity of the issue:
Severity is scored from 1 to 10, and the colour of the task card gives a visual clue to how serious the issue is:
| Severity Range | Background Color | Meaning |
|---|---|---|
| 1–2 | White (default) | Very low impact |
| 3–4 | Pale Blue | Low priority info |
| 5–6 | Light Green | Moderate, needs attention |
| 7–8 | Pale Yellow | High severity |
| 9–10 | Light Red | Critical – major customer issue |
This helps team members quickly scan the board and focus on what matters most first.
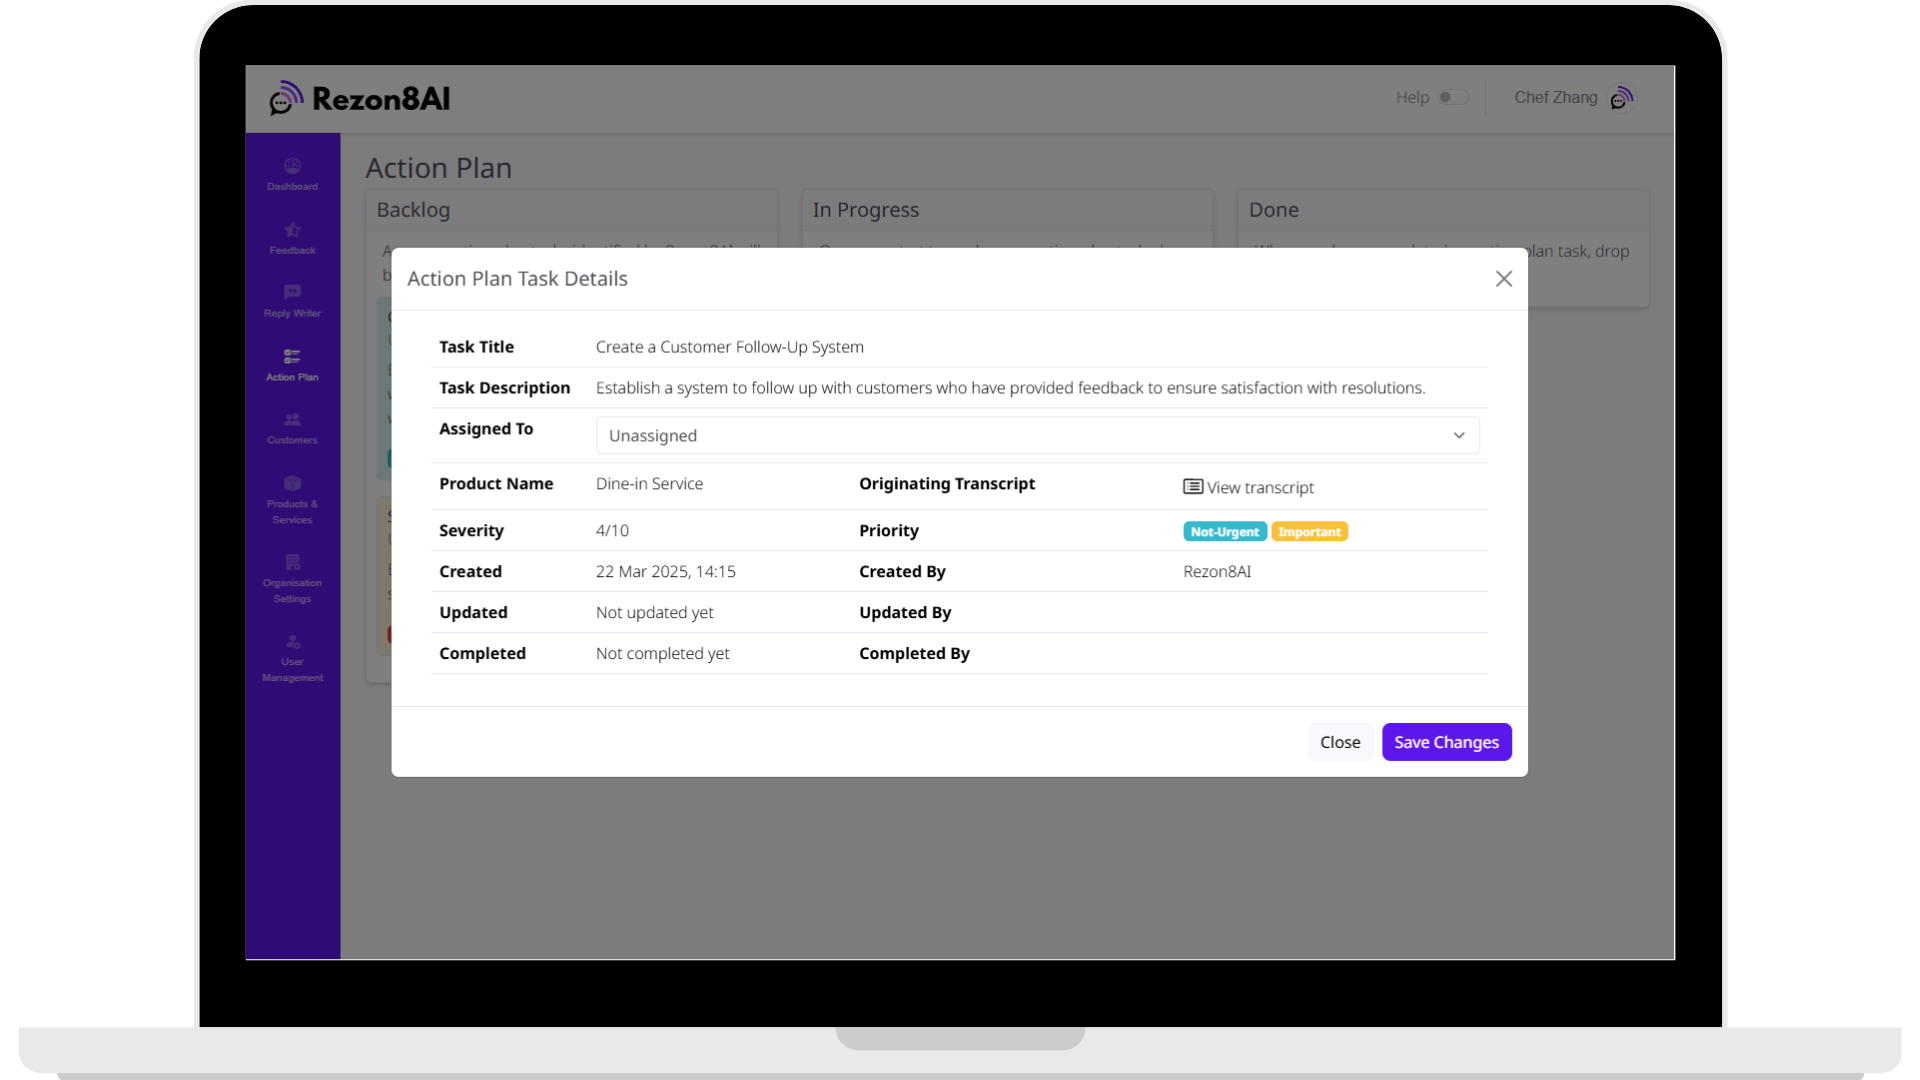
Viewing and Updating Task Details
To see full task details or assign someone:
-
Click the pencil icon on any task card.
-
A detail window will open, showing:
-
The full description
-
Severity and priority
-
Assigned user (or "Unassigned")
-
Task status (not completed, completed)
-
Date the task was created or updated
-
A chat transcript link that shows the original customer conversation along with the decisions and actions the AI has taken.
-
How to Use the Action Plan Step-by-Step
-
Check the Backlog regularly. New tasks appear here.
-
Click the pencil icon to open it and read the details, or expand the transcript.
-
Assign the task to yourself or a team member using the Assigned to dropdown. Then click the Save Changes button.
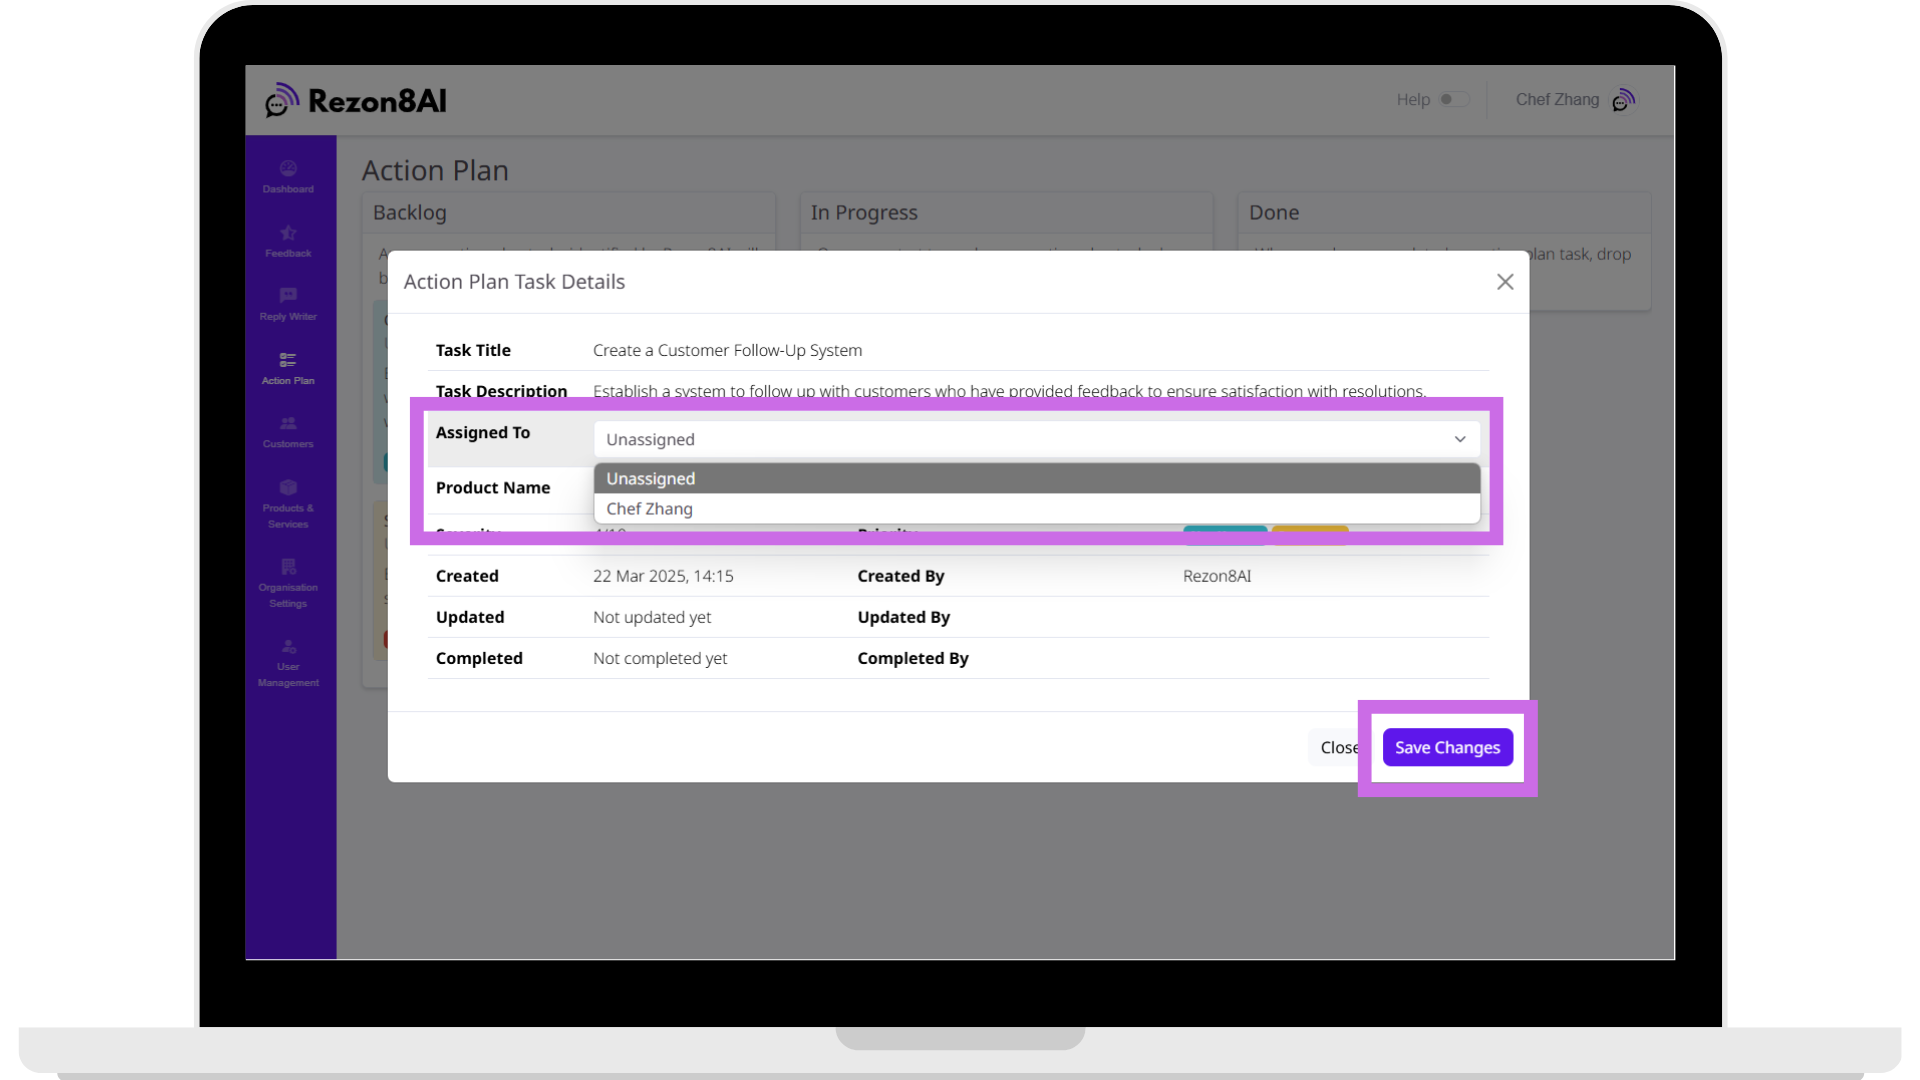
-
Drag the task into In Progress when work starts.
-
Drag it to Done when the issue is resolved.
💡 Pro Tip: Always check the chat transcript to fully understand what the customer experienced.
What Happens in the Background?
Tasks are created automatically from customer conversations when something needs action.
The AI decides:
-
If action is needed
-
What the task should be
-
How urgent and severe it is
🧠 Bonus: It Gets Smarter Over Time
If a new customer issue matches an existing task, Rezon8AI will:
-
Link the new conversation to the old task
-
Increase the severity or priority if appropriate
-
Help you spot recurring problems that need fixing at a bigger level
Why Use It?
-
Don’t miss problems – everything is captured automatically.
-
Assign tasks clearly – keep your team aligned.
-
Solve problems faster – with full context from the original customer.
-
Spot patterns early – to improve your business over time.
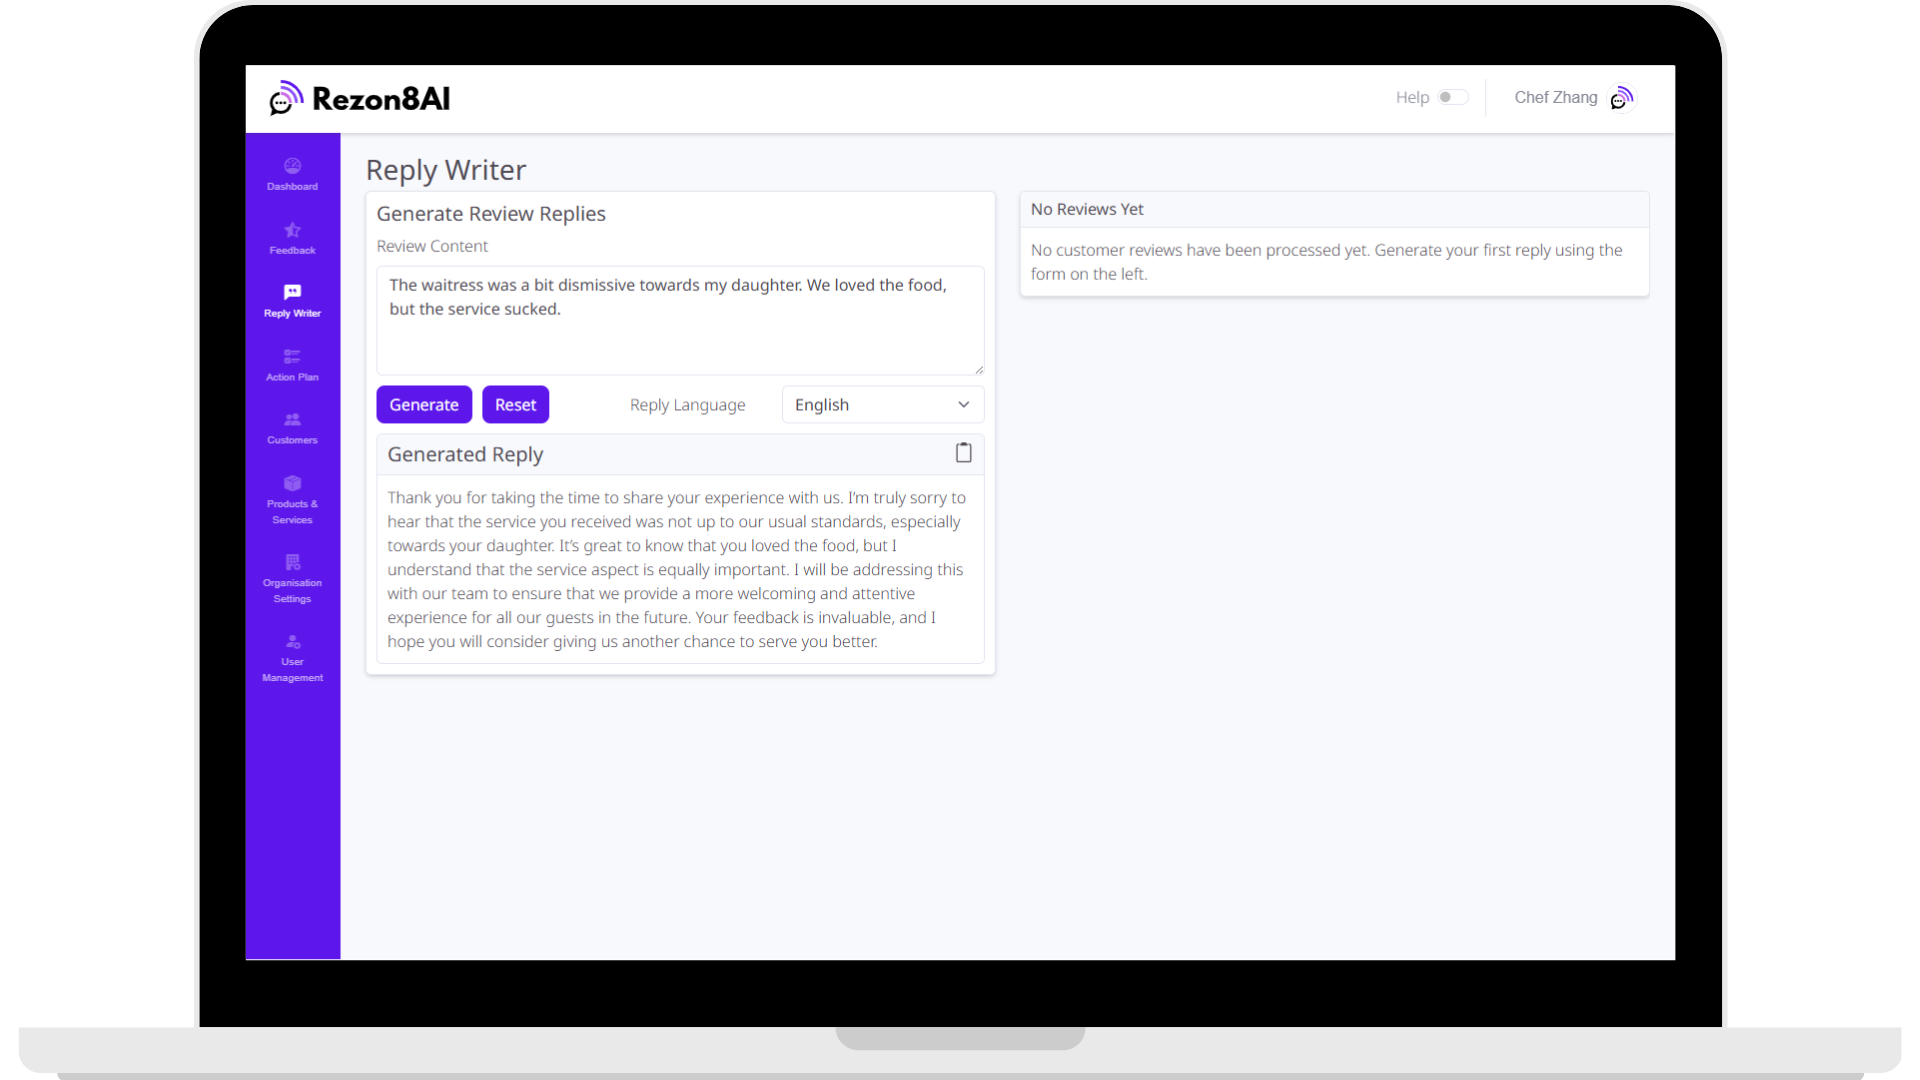
What Is the Rezon8AI Reply Writer?
The Reply Writer in Rezon8AI is a powerful AI tool that helps businesses respond to customer reviews quickly and professionally. It's designed to save time and improve customer engagement by writing intelligent, empathetic, and on-brand responses in multiple languages.
When you generate a reply:
-
The system classifies the sentiment of the review (e.g., frustrated, disappointed, happy).
-
It detects the theme (e.g., “Food Temperature”, “Service Quality”).
-
It estimates the customer’s NPS (Net Promoter Score).
-
It tries to identify the product or service the customer is referencing. If it succeeds then it will understand the product or service specifics that apply and will respond accordingly.
-
It crafts a thoughtful, contextual reply that matches your brand tone and language choice.
Use Cases & Benefits
| Use Case | Benefit |
|---|---|
| Responding to 1-star reviews | Retain customers by showing you care. |
| Replying in multiple languages | Engage international customers. |
| Maintaining brand tone | AI replies stay consistent. |
| Saving time | No need to write every reply manually. |
| Monitoring customer sentiment | Learn what people are really saying. |
How to Use the Reply Writer
What This Tool Is For
The Reply Writer helps you create fast, professional replies to customer reviews.
Whether you're handling glowing praise or critical feedback, this tool writes thoughtful, brand-appropriate responses with just one click.
📌 Bonus: It can also translate your reply into multiple languages, so you can serve a wider customer base without needing a translator.
When to Use It
Use the Reply Writer whenever:
-
You want to respond to a public customer review (Google Business, Trustpilot, Tripadvisor, Amazon, Yelp, etc.)
-
You need help wording a reply to tricky or negative feedback
-
You want to respond quickly without sacrificing professionalism
-
You serve customers in multiple languages and want replies tailored to them
Step-by-Step Guide - Step 1
Copy the Customer’s Review
You’ll typically get this from:
-
A review on Google, Facebook, Yelp, etc.
-
A social media message or comment on X, Facebook, Instagram etc
📌 Tip: You can copy the entire review, including the star ratings, date, name etc. Don't worry about grabbing some HTML or the formatting being a bit weird, the AI system will understand the context, but the extra information can be useful.
Step-by-Step Guide - Step 2
Paste the Review into the Input Box
In the Review Content field on the left, paste the customer’s review.
-
This is where Rezon8AI gets the context for your reply.
-
You can paste in short or long reviews—the system will handle both.
Step-by-Step Guide - Step 3
Choose the Reply Language
Use the Reply Language dropdown to select the language you want your response to be written in.
-
Defaults to English
-
Useful if your customer left a review in another language or your business serves multilingual audiences
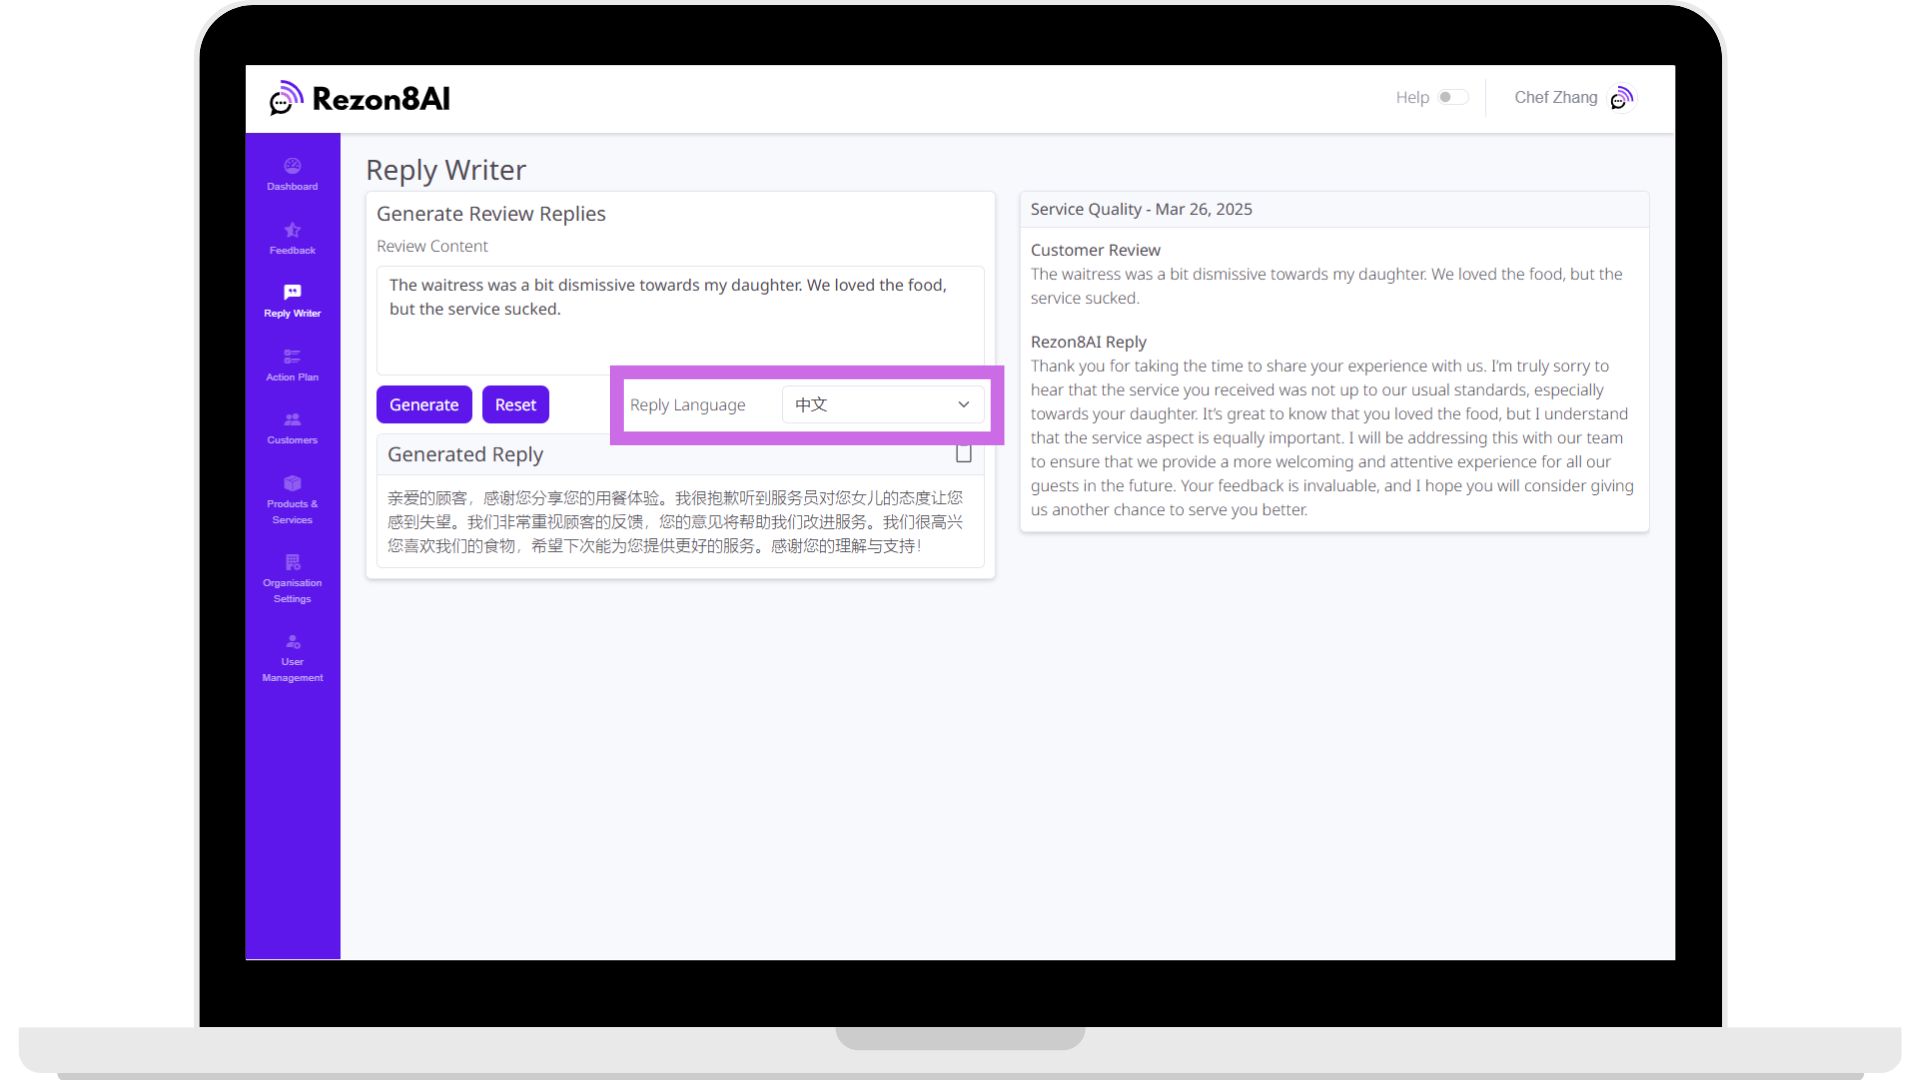
🌍 Supported languages include: Arabic, Chinese (simplified), Dutch, English, French, German, Greek, Hindi, Italian, Portugese, Spanish, and the same language as the review.
Step-by-Step Guide - Step 4
Click the Generate button
Hit the Generate button to let Rezon8AI create the perfect reply.
-
This may take a moment while the AI processes the review.
-
The reply will appear in the Generated Reply box just below.
✨ Behind the scenes, Rezon8AI is analysing sentiment, tone, and intent, then crafting a professional, empathetic response.
Step-by-Step Guide - Step 5
Review or Edit the Reply (Optional)
-
If the reply looks good, you can click the clipboard icon to copy it and then paste it directly to your review platform.
-
If needed, you can edit the wording in your own voice before posting it publicly.
🔁 Want to try a different tone or reword it? Just hit the Generate button again and the AI will make some subtle changes.